My most valued possession is my family. Even if you are living in a box
somewhere, and you have the love and support of your family, you will always be
wealthy. Love really is all you need. From love, great things will emerge. From
your thoughts, you can create greatness.This is what I need to remind
myself of everyday to be the best person that I can be. Live your life with
gratitude. Be thankful for all that you have everyday, even if it is your eyes
to see or your ears to hear or your feet to walk or your hands to create.
Understand your place in this Universe; how infinitesimally small you are, but
how huge a contribution your Spirit is. Don't wear blinders to the world around
you, you're not the only one here. Be kind, considerate, don't be judgmental,
love others, and yourself. Know that you are perfect inside; that you are
love.


Wednesday, February 20, 2013

Monogram Front Door Wreath

Well, hello! Did you all have a good Valentine's Day? Noah and I did. Though I didn't take the night off, we went to a nice local restaurant and had a very romantic dinner and the most delicious glass of wine by the fireplace talking about our goals that we are wanting to accomplish this year. For a married couple who have been together this long, being this compatible in our goals and dreams is romantic!

Anyway, I finished the front door wreath that I had been planning on for weeks now. I love it! It was terribly easy and so cheap! Read on, and I'll tell you how I did it...


A little while back, on one of my trips to Hobby Lobby, I picked up this chipboard letter while they were on sale. It was about $2.50 at 50% off. Since I don't live near enough to one to go anytime I want, I try to stock up on what I know I'll be using soon while there's a sale going on. I don't want to buy a bunch of stuff that will just collect on a shelf, so I'm glad I live far enough away to plan my trips. That way, I always buy on sale and only buy what I'll be using eventually in the near future. And, since there are always sales going on, I know I won't miss anything and can plan and get it next time.

 So...I had the paint, paintbrush, and little plastic cups with lids on hand-$0.
 I removed the sticker from the front of the letter. (There were two-one on front, one on back. I can never figure out WHY they always do this.) Then I just painted a THICK coat of pewter grey onto the letter. Don't forget the sides and a little on the back. You can paint the whole back if you want, but once it's attached, no one will see that part, so do what ever strikes your fancy.

Then have yourself a Hersey's Kiss (or two!) while it dries... 


Then, once it was good and dry I painted the whole thing with a THIN coat of the white. I wanted some of the grey to show through and to really show up after distressing. I used a real hair paintbrush because I wanted the paint strokes to show. However, no matter what I did, and no matter how much I washed and tried to pull out the loose strands, it still "shed" all over the initial. It did come off when sanding, but was super frustrating during the painting process. I'll probably stick to my good 'ol sponge brushes next time and just try to 'dry brush' extra paint (like the grey) for distressing.


While that was drying completely ( I even popped in the 300* oven for a couple minutes to 'cure' it and make sure it was REALLY dry...but watch it every second, it is made of paper!) I assembled my artificial flowers. Now here's the fun part. While shopping with my sister Saturday, I was at HL and was looking for just the right flowers. They have beautiful artificial flowers, and are always on sale, but that was still more than I wanted to pay, especially since I was going to take them apart. My sister told me to try the Dollarama we have right in town, she said there were great flowers there. So Sunday I ran uptown and found these beauties. All for a dollar a piece. $6!

I simply pulled the flower heads off the stems and they came right off, staying fully intact. Some I really had to cut the stems off because I wanted to glue them flat onto the letter, so I  reinforced those with hot glue, but that was it. The rest stayed intact and had enough stem to push down into the wreath. These were a great find!

I just layed them out where I wanted them, sticking them into the wreath and then picking them up one by one, adding the hot glue, and placing them right back where I wanted them. Easy peasy!


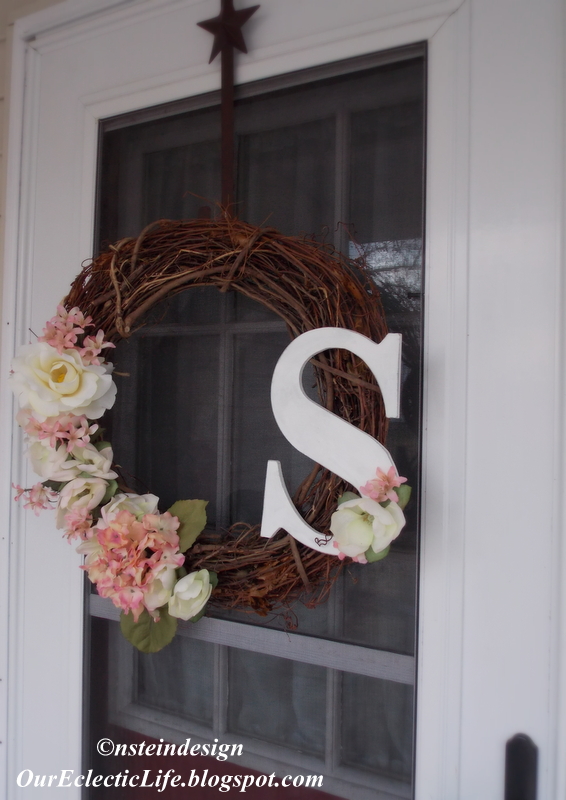
I had bought this grapevine wreath at Michael's a couple months ago, and used my 40% (or even 50%, I can't remember) coupon and it was around $5.


This is the initial for our last name after sanding and distressing. I used a scrapbooking sanding block because it's so easy to hold and has different grades of sandpaper on each side. It worked SO well.


Here are some close-ups of the details I got on the corners and edges after sanding. You can see the grey and the chipboard brown showing through nicely. I'm glad it turned out so well. It's really like an MDF type material and I have never used this before so I didn't know what to expect.


After all the flowers were glued on, I glued the "S" right onto the wreath. I had already layed everything out where I wanted it, so I could assemble everything easily and I would know where the flattest spot was on the wreath for the letter. Then I took a couple of the left over flowers, cut them close, and glued them onto the letter for visual interest to round out the design.

Here's the finished product. It makes me so happy when I pull into the driveway! It's vibrant and just a lovely thing for the door. I hadn't really wanted any pink at first, I wanted all white, but after looking at the dollar store and found these, they all went together so perfectly. Now I can't imagine not having a little pink! I is my favorite color, after all!


This is a Pinterest inspired project, of course, and you can see what inspired me here. You can find a lot of inspiration there for a million projects for your home on the cheap. I'd be delighted if you would follow my Pinterest boards. I have a follow button just in the upper right of my blog page. If you haven't already, it's worth a sign-up. But, I warn you, it's ADDICTING!!

Thanks you so much for reading today, I hope this project inspired you to try something beautiful for your home.

Have a great rest of the week,

Nanette

Sunday, February 3, 2013

Precious little vintage items

Hey, Everybody!

Hope your weekend is going well! I'm working on a lot of things right now, but took a little break and went with my sister to this craft and antique mall that I actually used to have a booth in called the Alton Exchange (you can also check out the facebook page here ). I found a few little things that made me oh, so happy and just wanted to share them with you today.

I love, love this place...it is so well organized and there are a TON of booths to give you so many options to find something special. Plus, Terry is one of the greatest gals around; she works so hard to make the experience in her shop one that will keep you coming back time and time again.

As I wandered the rows and rows of unique and ever changing vintage, antique and handmade booths, I picked up a few things that just seemed to pop out at me last night.

Here's what I got...


A closer look will reveal a couple of little facts about us, I guess...


These little 'ashtrays' were just sitting on a shelf together. I got both for only $5! They were pristine and unused. I thought they were the cutest thing for a bookshelf or table. Had to have those...


 I also happened upon a rack with many different pieces of jewelry. These little handmade bead bracelets were only $2! So, of course, I had to have two! Sure, I could make them myself, but I really do love supporting local artisans whenever I can. I think it is super important to buy local and to support the creativity in each other whenever we can.


I am obsessed always on the lookout for old wooden boxes, cheese boxes, sewing machine and cash drawers, etc. My sister snatched up the sewing machine drawer that we saw at the same time (a little healthy competition is good, right!?) but I found this little guy on a shelf, and it was only about $5! A vintage Wisconsin cheese box--right up my ally. I've got some ideas stirring around for this...


I seem to unconsciously be drawn to the color turquoise (or teal). I hadn't realized this until I was putting all the pictures together...


I also picked up a 10 yard roll of burlap garland. Now, I know I just bought some of this in St. Charles that I used on my Christmas tree that you can read about in this post, but this is a little bigger, and it cost half as much...HALF!!!  At only $12 bucks...imagine all the possibilities!


The other thing I found was just about as random as you can get. Up on a shelf I noticed this Jewish/Hebrew item. It had definitely been used, and I was curious. Noah and I are always on the lookout for unique items to honor his Hebrew roots and this was too good to pass up. It's a napkin holder, of all things! When Noah met us at the Exchange after work (yep, ladies I've got a husband who loves to go antiquing as well as work on Hot Rods in a garage!) I showed it to him and he had to have it. He said "That will look great..." and we both finished simultaneously with "...up on a shelf in the kitchen."
It's great to be married to your best friend.  :)


Anyway, I hope my little findings inspire you to go picking through an antique mall in your neck of the woods. Imagine the treasures you could find, not to mention how happy you can make some local vendors, right?

By the way, I have a big P.S. As you may already know, I have another blog called confessions of a thinkaholic. I also regularly submit blog posts to a fantastic website called tiny buddha, and my newest (and third) post is up on the site. You can read it here, if you're interested. It's titled "Letting Go of Fears and Worries About Getting Things Done." I so appreciate it if you do, but no worries if it's not your thing! Both my blogs are completely judge-free zones; I just want you to enjoy yourself while you are here.
Just know that I appreciate you and am so happy you stopped by today!
Nanette

*Coming soon...Valentine's Day decor!

Friday, February 1, 2013

Valentine's Pillow Covers and Wreath


Hello! Hope your week is going great for you, so far.
Monday I finally finished up my little Valentine's Day wreath. The pillows have been done since January, because I always like my pillows to do double-duty so I can just flip them around when necessary. It really saves time and space. Less to change out and pack away! I made them the very same way I make all my pillow covers. You can see a quick tutorial here of the original pillow covers I made for Fall and the flip side of these covers for my winter/January decor right here.


I used muslin as the material for the front and back cover, and a red and white ticking for the front decorative panel, and sewed that to the muslin. Then I used some creamy white chenille fabric and some burgundy wool felt for the hearts. I just cut those out and placed them where I liked them, pinned them to the ticking and sewed them on. I was then able to sew the two panels together, leaving a good enough sized opening at the bottom for my pillow to be slipped in. While it was still inside out, I folded the hem of the opening over and pinned it and sewed that to make a good sturdy hem for the closure. I turned it right side out, and hand-sewed the twine on for the tie closures. All this is detailed in my winter pillow cover post.


Don't you just LOVE these flowers?! I found a tutorial of these on that Pinning site...you know the one. Here's the link to her blog Ruffles and Stuff, where I learned all about making them. It is a CUTE little blog!


Anyway, I picked through my fabric stash (I love fabric and buy a yard or two when it's on sale whenever I get around to getting to a fabric store and quite have the impressive bookcase full little stash!)
I decided on what reminded me of sweetness, romance, love, and Valentine's Day!


 I made them over the course of a week or so while watching telly or having a "crafting moment" on the weekend and made enough for the projects I wanted to complete for February. I will be making a lot more for next months wreath that I want all year 'round on the front door with our initial and some of these flowers in a larger scale. I'm working on that this weekend!


 I had been milling over what type of wreath to make for the front door for a while, and I was actually just going to buy one of those ready made store-bought hearts with all the sparkly red tinsel hearts on it and froo-froo it up, but my husband didn't really like that idea. Truth. He had an opinion about the Valentine's wreath.
So, I had this grapevine heart wreath for ever and I just decided to pull off the out of date stuff that was on it and use it for my wreath. Kinda perfect, right?

I started to just pull the old dried flowers off, the hot glue was so old it just popped off without damaging anything. I know it might seem pack-ratty to keep everything, but I have craft closets, and I don't really have that much. Just stuff that will save me a ton of money if I don't have to re-buy it. Do you know how much grapevine wreaths can be? I have a bundle of them that I got at a yardsale for next to nothing, HUGE ones, and all I had to do was take the old decorations off.

 
Ok, back to the dissasembly...and enter my "helper". She is just about the most curious cat there is. Loves the sound of tape being torn from anything and will climb a mountain to get it. Completely disarms you of your needle and thread if you are trying to so much as sew a button (like tonight) to eat your thread, and of course, she must try the grapevine stems of your wreath if you happen to be working on the floor. Not that a table would stop her.


Oh, yeah...she rolled all in the discarded dried stuff, too. And tried to eat it. And attack it. She's pretty spunky for a 13 year old.


I'm sorry I don't have any assembly pictures, but I can walk you through it. It's pretty self explanatory. I definitely wanted to use the flowers I made, and wanted to incorporate the word love somehow. I found a box of red glittery chipboard letters that I had. They were the perfect size. I would have loved to use that new burlap garland I just bought , but I couldn't figure out how to incorporate it. Plus, I wanted this to be light and airy. I had a bunch of tulle I bough on sale just before Christmas so I cut a long strip of that and weaved it through the wreath. It seemed made for something to be weaved right through there, so that worked out, too.


Then I tried my letters out until I found the right spot for them and hot glued those down.


Next, I started laying the flowers around until they looked right. I had more white ones than anything else and one teeny tiny flower, so I placed them by the "L" to use all the flowers and ballance the look. When I decided on the placement, I just hot glued all of those down, as well.


I really like it! It's not what I was thinking of at first, but I don't think I really knew what I was thinking of. It matches my pillows and I finally used a wreath I've had for years that I didn't know what to do with. The best part about all of these projects...it was all free!!


I truly hope you have a wonderful Valentine's Day. If you're a couple, do something nice together. It doesn't have to cost a thing! Make dinner together from a new recipe topped off with a special dessert you both made, and watch a romantic movie at home. One of our favorites is "The Notebook".  If you are parents, take your kids to the movie or have a movie night at home. Look online for Valentine themed party ideas and play some games and make treats with your kids. If you're single, get together with some of your single friends and go to dinner, or a winery, or have a dinner party at home. Watch a goofy, funny, sappy romantic movie like "Date Night" and laugh together. Or treat yourself to an evening of shopping or a trip to the salon. A quiet night at home curled up with a book with the ringer and television off or a glass of wine and an old black and white like "Casablanca" is a great way to treat yourself. No matter what you decide to do, treat yourself, and others well, and spread some Love!


                   Have a great week! Have a great Valentine's Day! Eat some chocolate!!

With Love,

Nanette

“How do I love thee? Let me count the ways.
I love thee to the depth and breadth and height
My soul can reach”
Elizabeth Barrett Browning