Good Morning and Happy Cinco de Mayo!
The next installment of "Sunday's With Buddha" is up at the other blog. Hope you can stop by and check it out with the link below. While you're there, let me know what you think...
Have a great weekend!
Nanette
P.S. I'll be uploading some projects here, soon...I promise!
confessions of a thinkaholic: Sundays With Buddha: Week Two “By your own folly you will be brought as low as your worst enemy wishes.” ...
Sunday, May 5, 2013

Sunday, April 28, 2013
confessions of a thinkaholic: Sundays With Buddha
Hello, Everyone!
Happy Sunday. I have really been working on a lot of projects, lately. I had promiseda long time ago several posts ago to share the link to my SmugMug account so you could check out more of my photos. I am by far NOT a professional photographer and I use a very modest camera, for now *hint hint*, but I try to capture those moments that make me remember the beauty of the world around us; one of our greatest gifts. I've been participating in Instagram recently and I am amazed at the talent and appreciation for beauty that is shared by so many. If you are on Instagram and would like to see what I've been up to, follow along with me at @nsteindesign.
I still have so many photos of the Smokies to edit and upload, but there are plenty in there, now, as well as many other galleries of photos. I'd love it if you could check out my SmugMug, and you can just by clicking this link!: http://nsteindesign.smugmug.com/
Well, I really do have a lot of projects that I want to start on and share with you. I'm hoping this rainy chilly weather here in (northern) Southern Illinois warms up and dries up so I can get started!
I hope you have a great 'rest of the weekend'. Thank you, in advance for stopping by my sister blog, "Confessions", I hope you enjoy the new series!
confessions of a thinkaholic: Sundays With Buddha: Week One "As a mother would risk her life to protect her child, her only child, even so should one cultivate a limitless heart with ...
Nanette
Happy Sunday. I have really been working on a lot of projects, lately. I had promised
I still have so many photos of the Smokies to edit and upload, but there are plenty in there, now, as well as many other galleries of photos. I'd love it if you could check out my SmugMug, and you can just by clicking this link!: http://nsteindesign.smugmug.com/
Well, I really do have a lot of projects that I want to start on and share with you. I'm hoping this rainy chilly weather here in (northern) Southern Illinois warms up and dries up so I can get started!
I hope you have a great 'rest of the weekend'. Thank you, in advance for stopping by my sister blog, "Confessions", I hope you enjoy the new series!
confessions of a thinkaholic: Sundays With Buddha: Week One "As a mother would risk her life to protect her child, her only child, even so should one cultivate a limitless heart with ...
Nanette
Sunday, April 21, 2013
A Quick Little Dinner
Hello
I hope this finds you all well. I know I've been on a bit of a hiatus, but I'm wanting to get right back into the blogging I enjoy so much. My last post explained a little of why I needed to take a break, and I thought I was going to be back after that, but I guess I just wasn't ready yet. I think I am now, though, and I want to share an easy post with you here. A quick little dinner I made tonight, thanks to a Weight Watchers recipe, believe it or not. And it was quite good. It passed the family taste-test with flying colors. And it really was quick to whip up.
Here's the recipe:
Lemon Chicken With Broccoli
Ingredients
2 Tbsp all-purp flour, divided
1/2 tsp table salt, divided
1/4 tsp black pepper
2 tsp olive oil
12 oz uncooked, boneless,
skinless chicken breasts
1 1/2 cups fat-free, reduced-
sodium chicken broth, divided
2 tsp minced garlic
2 1/2 cups uncooked small
broccoli florets
2 tsp lemon zest, or more to taste
2 Tbsp chopped fresh parsley
1 Tbsp fresh lemon juice
Directions
Combine 1 1/2 Tbsp flour, 1/4 tsp each salt and pepper on a plate. Add chicken and toss to coat. (I cut up the chicken into little chunks)
Heat oil in a nonstick skillet over medium-high heat. Add chicken and cook, turning as needed, until lightly browned and cooked through, about 5 minutes (mine did take a bit longer), remove to a plate.
Put 1 cup broth and garlic into the skillet; bring to a boil over high heat, scraping up the browned bits from the skillet. Add broccoli; cover and cook 1 minute.
In the measuring cup, stir together remaining 1/2 cup broth, 1/2 Tbsp flour, and 1/4 tsp salt; add to skillet and bring to simmer over low heat.
Cover and cook until broccoli is crisp-tender and sauce is slightly thickened, about 1 1/2 minutes. Stir in chicken and lemon zest, heat through.
Remove skillet from heat and stir in parsley and lemon juice, toss to coat.
Makes 4 servings, about 1 cup per serving.
And this is how I adapted it:
I gathered my ingredients. $12. That's it. Believe it or not. Including the 1 3/4 lbs thin cut and trimmed chicken, and I have three breast left to freeze for another meal.


Fitting snug and perfect in the skillet...

The recipe suggested angel hair pasta, rice or couscous. We love couscous, but we always have that, so I thought angel hair pasta would be the perfect match up. I know the pot looks small, but the pasta shrank down quickly and it worked out just fine.

I added the broth and garlic, scraped the pan, and added the broccoli and let it simmer. This is where I had to improvise a bit. The next step in the recipe says to add 1/2 Tbsp flour to the 1/2 cup broth and add that to the pan, cover and cook until the sauce is thickened. This did not happen...

Lemon Zest from one large lemon...Yum!

Anyway, back to my not-so-thick sauce...I uncovered the skillet, added the chicken and zest, and that still did not thicken the sauce. I was afraid that if I let is simmer any longer, my broccoli would turn to mush. So I quickly added another 1/2 Tbsp of flour and viola! Immediate thickness. Not to mention how wonderful it smelled!

You can serve this separately, with some pasta tossed in olive oil and a little salt, pepper and garlic....

....pair them side by side ....


I hope you are encouraged to try this one. I was done cooking and we were sitting down to dinner within 30 minutes. And for just $12 for all three of us, with pasta and chicken left over for another meal, what a bargain.
I've got a ton more pictures of places and things we've been doing lately, and I can't wait to share them with you, so check back for that. Also, if you read my other blog, I've got some great ideas brewing for over there, as well.
Thanks for reading today!
Have a great week...
Nanette
I hope this finds you all well. I know I've been on a bit of a hiatus, but I'm wanting to get right back into the blogging I enjoy so much. My last post explained a little of why I needed to take a break, and I thought I was going to be back after that, but I guess I just wasn't ready yet. I think I am now, though, and I want to share an easy post with you here. A quick little dinner I made tonight, thanks to a Weight Watchers recipe, believe it or not. And it was quite good. It passed the family taste-test with flying colors. And it really was quick to whip up.
Here's the recipe:
Lemon Chicken With Broccoli
Ingredients
2 Tbsp all-purp flour, divided
1/2 tsp table salt, divided
1/4 tsp black pepper
2 tsp olive oil
12 oz uncooked, boneless,
skinless chicken breasts
1 1/2 cups fat-free, reduced-
sodium chicken broth, divided
2 tsp minced garlic
2 1/2 cups uncooked small
broccoli florets
2 tsp lemon zest, or more to taste
2 Tbsp chopped fresh parsley
1 Tbsp fresh lemon juice
Directions
Combine 1 1/2 Tbsp flour, 1/4 tsp each salt and pepper on a plate. Add chicken and toss to coat. (I cut up the chicken into little chunks)
Heat oil in a nonstick skillet over medium-high heat. Add chicken and cook, turning as needed, until lightly browned and cooked through, about 5 minutes (mine did take a bit longer), remove to a plate.
Put 1 cup broth and garlic into the skillet; bring to a boil over high heat, scraping up the browned bits from the skillet. Add broccoli; cover and cook 1 minute.
In the measuring cup, stir together remaining 1/2 cup broth, 1/2 Tbsp flour, and 1/4 tsp salt; add to skillet and bring to simmer over low heat.
Cover and cook until broccoli is crisp-tender and sauce is slightly thickened, about 1 1/2 minutes. Stir in chicken and lemon zest, heat through.
Remove skillet from heat and stir in parsley and lemon juice, toss to coat.
Makes 4 servings, about 1 cup per serving.
And this is how I adapted it:
I gathered my ingredients. $12. That's it. Believe it or not. Including the 1 3/4 lbs thin cut and trimmed chicken, and I have three breast left to freeze for another meal.


I chopped the chicken into bite-sized pieces, mixed the flour, salt and pepper, and tossed each piece. Not as time consuming as you'd think, besides, I found it to be a perfect time to think.
I'm sure I used a bit more than the 12 oz of chicken, I didn't weigh it, but it turned out to be perfect for the amount of flour the recipe called for.

Fitting snug and perfect in the skillet...

The recipe suggested angel hair pasta, rice or couscous. We love couscous, but we always have that, so I thought angel hair pasta would be the perfect match up. I know the pot looks small, but the pasta shrank down quickly and it worked out just fine.

I added the broth and garlic, scraped the pan, and added the broccoli and let it simmer. This is where I had to improvise a bit. The next step in the recipe says to add 1/2 Tbsp flour to the 1/2 cup broth and add that to the pan, cover and cook until the sauce is thickened. This did not happen...

Lemon Zest from one large lemon...Yum!

Anyway, back to my not-so-thick sauce...I uncovered the skillet, added the chicken and zest, and that still did not thicken the sauce. I was afraid that if I let is simmer any longer, my broccoli would turn to mush. So I quickly added another 1/2 Tbsp of flour and viola! Immediate thickness. Not to mention how wonderful it smelled!

You can serve this separately, with some pasta tossed in olive oil and a little salt, pepper and garlic....

....pair them side by side ....

...or serve on top of the pasta like I did, all tossed up...
DELISH!

I hope you are encouraged to try this one. I was done cooking and we were sitting down to dinner within 30 minutes. And for just $12 for all three of us, with pasta and chicken left over for another meal, what a bargain.
I've got a ton more pictures of places and things we've been doing lately, and I can't wait to share them with you, so check back for that. Also, if you read my other blog, I've got some great ideas brewing for over there, as well.
Thanks for reading today!
Have a great week...
Nanette
Saturday, April 20, 2013
A new post at Tiny Buddha
I have a new article posted on Tiny Buddha (tinybuddha.com). If you head over there you will find a lot of great posts by some really great people. Thanks for taking the time to read my personal blogs and my submissions at Tiny Buddha.
Have a wonderful week!
Nanette
Have a wonderful week!
Nanette
Friday, April 5, 2013
A little explination on where I've been...confessions of a thinkaholic: Coming back from a little time for myself...
confessions of a thinkaholic: Coming back from a little time for myself...: Hello, everyone, I have to apologize for being so absent this last month or so. I've been on a bit of a solitude mission. I haven'...
I want to hear from you! Please don't be shy...I learn from you, too! Your opinion matters to me, but, please, no judgement or hateful words here.Thanks!
I want to hear from you! Please don't be shy...I learn from you, too! Your opinion matters to me, but, please, no judgement or hateful words here.Thanks!
Wednesday, February 20, 2013
Monogram Front Door Wreath
Well, hello! Did you all have a good Valentine's Day? Noah and I did. Though I didn't take the night off, we went to a nice local restaurant and had a very romantic dinner and the most delicious glass of wine by the fireplace talking about our goals that we are wanting to accomplish this year. For a married couple who have been together this long, being this compatible in our goals and dreams is romantic!
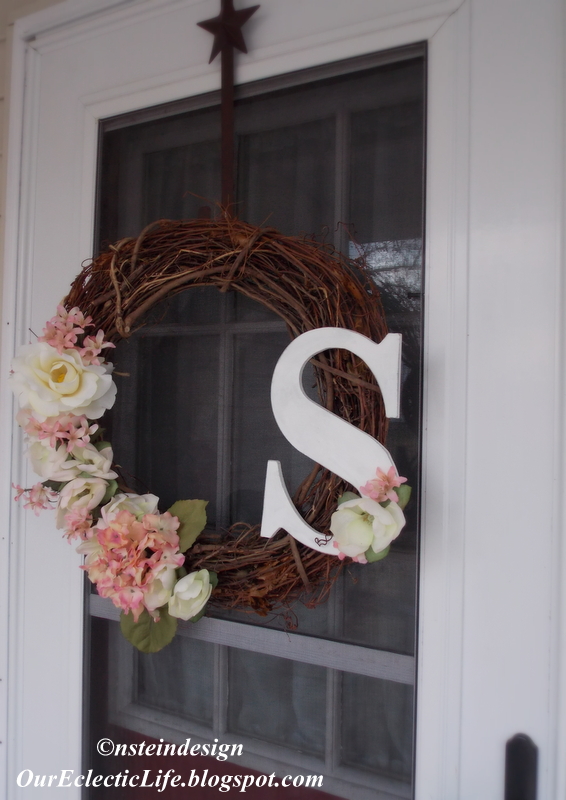
Anyway, I finished the front door wreath that I had been planning on for weeks now. I love it! It was terribly easy and so cheap! Read on, and I'll tell you how I did it...
A little while back, on one of my trips to Hobby Lobby, I picked up this chipboard letter while they were on sale. It was about $2.50 at 50% off. Since I don't live near enough to one to go anytime I want, I try to stock up on what I know I'll be using soon while there's a sale going on. I don't want to buy a bunch of stuff that will just collect on a shelf, so I'm glad I live far enough away to plan my trips. That way, I always buy on sale and only buy what I'll be using eventually in the near future. And, since there are always sales going on, I know I won't miss anything and can plan and get it next time.
So...I had the paint, paintbrush, and little plastic cups with lids on hand-$0.
I removed the sticker from the front of the letter. (There were two-one on front, one on back. I can never figure out WHY they always do this.) Then I just painted a THICK coat of pewter grey onto the letter. Don't forget the sides and a little on the back. You can paint the whole back if you want, but once it's attached, no one will see that part, so do what ever strikes your fancy.
Then have yourself a Hersey's Kiss (or two!) while it dries...

Then, once it was good and dry I painted the whole thing with a THIN coat of the white. I wanted some of the grey to show through and to really show up after distressing. I used a real hair paintbrush because I wanted the paint strokes to show. However, no matter what I did, and no matter how much I washed and tried to pull out the loose strands, it still "shed" all over the initial. It did come off when sanding, but was super frustrating during the painting process. I'll probably stick to my good 'ol sponge brushes next time and just try to 'dry brush' extra paint (like the grey) for distressing.

While that was drying completely ( I even popped in the 300* oven for a couple minutes to 'cure' it and make sure it was REALLY dry...but watch it every second, it is made of paper!) I assembled my artificial flowers. Now here's the fun part. While shopping with my sister Saturday, I was at HL and was looking for just the right flowers. They have beautiful artificial flowers, and are always on sale, but that was still more than I wanted to pay, especially since I was going to take them apart. My sister told me to try the Dollarama we have right in town, she said there were great flowers there. So Sunday I ran uptown and found these beauties. All for a dollar a piece. $6!
I simply pulled the flower heads off the stems and they came right off, staying fully intact. Some I really had to cut the stems off because I wanted to glue them flat onto the letter, so I reinforced those with hot glue, but that was it. The rest stayed intact and had enough stem to push down into the wreath. These were a great find!
I just layed them out where I wanted them, sticking them into the wreath and then picking them up one by one, adding the hot glue, and placing them right back where I wanted them. Easy peasy!

I had bought this grapevine wreath at Michael's a couple months ago, and used my 40% (or even 50%, I can't remember) coupon and it was around $5.

This is the initial for our last name after sanding and distressing. I used a scrapbooking sanding block because it's so easy to hold and has different grades of sandpaper on each side. It worked SO well.

Here are some close-ups of the details I got on the corners and edges after sanding. You can see the grey and the chipboard brown showing through nicely. I'm glad it turned out so well. It's really like an MDF type material and I have never used this before so I didn't know what to expect.


After all the flowers were glued on, I glued the "S" right onto the wreath. I had already layed everything out where I wanted it, so I could assemble everything easily and I would know where the flattest spot was on the wreath for the letter. Then I took a couple of the left over flowers, cut them close, and glued them onto the letter for visual interest to round out the design.
Here's the finished product. It makes me so happy when I pull into the driveway! It's vibrant and just a lovely thing for the door. I hadn't really wanted any pink at first, I wanted all white, but after looking at the dollar store and found these, they all went together so perfectly. Now I can't imagine not having a little pink! I is my favorite color, after all!



This is a Pinterest inspired project, of course, and you can see what inspired me here. You can find a lot of inspiration there for a million projects for your home on the cheap. I'd be delighted if you would follow my Pinterest boards. I have a follow button just in the upper right of my blog page. If you haven't already, it's worth a sign-up. But, I warn you, it's ADDICTING!!
Thanks you so much for reading today, I hope this project inspired you to try something beautiful for your home.
Have a great rest of the week,
Nanette
Sunday, February 3, 2013
Precious little vintage items
Hey, Everybody!
Hope your weekend is going well! I'm working on a lot of things right now, but took a little break and went with my sister to this craft and antique mall that I actually used to have a booth in called the Alton Exchange (you can also check out the facebook page here ). I found a few little things that made me oh, so happy and just wanted to share them with you today.
I love, love this place...it is so well organized and there are a TON of booths to give you so many options to find something special. Plus, Terry is one of the greatest gals around; she works so hard to make the experience in her shop one that will keep you coming back time and time again.
As I wandered the rows and rows of unique and ever changing vintage, antique and handmade booths, I picked up a few things that just seemed to pop out at me last night.
Here's what I got...
A closer look will reveal a couple of little facts about us, I guess...

These little 'ashtrays' were just sitting on a shelf together. I got both for only $5! They were pristine and unused. I thought they were the cutest thing for a bookshelf or table. Had to have those...


I also happened upon a rack with many different pieces of jewelry. These little handmade bead bracelets were only $2! So, of course, I had to have two! Sure, I could make them myself, but I really do love supporting local artisans whenever I can. I think it is super important to buy local and to support the creativity in each other whenever we can.

I amobsessed always on the lookout for old wooden boxes, cheese boxes, sewing machine and cash drawers, etc. My sister snatched up the sewing machine drawer that we saw at the same time (a little healthy competition is good, right!?) but I found this little guy on a shelf, and it was only about $5! A vintage Wisconsin cheese box--right up my ally. I've got some ideas stirring around for this...


I seem to unconsciously be drawn to the color turquoise (or teal). I hadn't realized this until I was putting all the pictures together...
I also picked up a 10 yard roll of burlap garland. Now, I know I just bought some of this in St. Charles that I used on my Christmas tree that you can read about in this post, but this is a little bigger, and it cost half as much...HALF!!! At only $12 bucks...imagine all the possibilities!

The other thing I found was just about as random as you can get. Up on a shelf I noticed this Jewish/Hebrew item. It had definitely been used, and I was curious. Noah and I are always on the lookout for unique items to honor his Hebrew roots and this was too good to pass up. It's a napkin holder, of all things! When Noah met us at the Exchange after work (yep, ladies I've got a husband who loves to go antiquing as well as work on Hot Rods in a garage!) I showed it to him and he had to have it. He said "That will look great..." and we both finished simultaneously with "...up on a shelf in the kitchen."
It's great to be married to your best friend. :)

Hope your weekend is going well! I'm working on a lot of things right now, but took a little break and went with my sister to this craft and antique mall that I actually used to have a booth in called the Alton Exchange (you can also check out the facebook page here ). I found a few little things that made me oh, so happy and just wanted to share them with you today.
I love, love this place...it is so well organized and there are a TON of booths to give you so many options to find something special. Plus, Terry is one of the greatest gals around; she works so hard to make the experience in her shop one that will keep you coming back time and time again.
As I wandered the rows and rows of unique and ever changing vintage, antique and handmade booths, I picked up a few things that just seemed to pop out at me last night.
Here's what I got...
A closer look will reveal a couple of little facts about us, I guess...

These little 'ashtrays' were just sitting on a shelf together. I got both for only $5! They were pristine and unused. I thought they were the cutest thing for a bookshelf or table. Had to have those...


I also happened upon a rack with many different pieces of jewelry. These little handmade bead bracelets were only $2! So, of course, I had to have two! Sure, I could make them myself, but I really do love supporting local artisans whenever I can. I think it is super important to buy local and to support the creativity in each other whenever we can.

I am


I seem to unconsciously be drawn to the color turquoise (or teal). I hadn't realized this until I was putting all the pictures together...
I also picked up a 10 yard roll of burlap garland. Now, I know I just bought some of this in St. Charles that I used on my Christmas tree that you can read about in this post, but this is a little bigger, and it cost half as much...HALF!!! At only $12 bucks...imagine all the possibilities!

The other thing I found was just about as random as you can get. Up on a shelf I noticed this Jewish/Hebrew item. It had definitely been used, and I was curious. Noah and I are always on the lookout for unique items to honor his Hebrew roots and this was too good to pass up. It's a napkin holder, of all things! When Noah met us at the Exchange after work (yep, ladies I've got a husband who loves to go antiquing as well as work on Hot Rods in a garage!) I showed it to him and he had to have it. He said "That will look great..." and we both finished simultaneously with "...up on a shelf in the kitchen."
It's great to be married to your best friend. :)

Anyway, I hope my little findings inspire you to go picking through an antique mall in your neck of the woods. Imagine the treasures you could find, not to mention how happy you can make some local vendors, right?
By the way, I have a big P.S. As you may already know, I have another blog called confessions of a thinkaholic. I also regularly submit blog posts to a fantastic website called tiny buddha, and my newest (and third) post is up on the site. You can read it here, if you're interested. It's titled "Letting Go of Fears and Worries About Getting Things Done." I so appreciate it if you do, but no worries if it's not your thing! Both my blogs are completely judge-free zones; I just want you to enjoy yourself while you are here.
Just know that I appreciate you and am so happy you stopped by today!
Nanette
*Coming soon...Valentine's Day decor!
Subscribe to:
Posts (Atom)