I found a quick little graphic list of what to compost and what not to (yay, Pinterest!)...neat for a quick reference and for kids, too.
Check it out right here.
=)
Showing posts with label compost diy. Show all posts
Showing posts with label compost diy. Show all posts
Saturday, September 15, 2012

Thursday, September 13, 2012
Compost bin done...FINALLY!!!
Well! We finally got it done. After one wash-out weekend, uneven work schedules, and even Noah's 39th birthday, we got the compost bin built and the new compost pile started. I have a ton of pics, but will try to condense. I have plenty of instructions, and a link to a great site I used for reference in compiling the compost layers. I will share all the trial's and error's we encountered, and what worked and what we will do better next time.
I'll try to keep it as brief as possible... :)
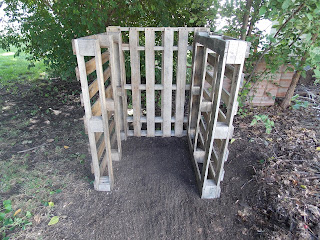
Ok, remember the pallets from my last compost post? Well, we took those three and this is what we did.
We set them up 'tall' instead of short and stout in case the pile gets high through the fall with the mulched leaves. It looks a little funny, but that's what we decided to do. You can see it a few pics down. Anyway, Noah used a drill to first drill a long pilot hole in the wood. These pallets were so hard to get through. He did have to get his more powerful drill. We now recommend using thicker, stronger screws. Ours were 3" x 8mm. They worked well, but we had to go in from the back after this first initial try...


This worked so much better!


It really is nice and sturdy. We were going to use some rebar down the inside channels formed by the slats for stability, that's another reason we set them up this way, but it really is sturdy enough this way. This particular wood is so very heavy! We plan on making one or two more bins attached to this one. It's good to have a place to store your mulched leaves and grass clippings to add to your compost pile, and to start a new one after the first gets going really well, that way you can keep turning the first, and generate your broken down material, move that out and store it, and just keep it up by doing the same with the second bin, while making a fresh bin out of the emptied first.
I raked the old compost dirt bed out to get it ready...


Then I added a layer of dried grass clippings from mowing the day before that had dried out well in the sun. We just swept them up like we usually do after mowing the yard...

The next step is to add some compost starter. I used my compost from the previous years. It has all the materials already broken down into a rich black 'soil'. This helps to start the compost cycle quicker...


A little yucky, but SO valuable...


I also needed "wet stuff". I dug through my old compost area and found the wet leaves and very broken down veggie matter to layer on top of the new pile. Moisture is important in your composting process, too. If it gets too dry, and your "green" items and old wet compost isn't enough to keep it moist, you can wet it every so often.

Be careful digging around in damp decaying areas...This guy climbed out just after I pulled up a few handfuls of the stuff above...


So...I layered my "wet" old compost on top of the food stuff, then added more of my starter soil as above...

Then another layer of grass clippings...

Then more starter soil...

Then more dried leaves...
You just have to keep adding to your layers, making sure the food stuff is covered well, in case of animals. You also want to keep a check on it for smells...if that fruit isn't covered well in the heat...well, it stinks! You don't want your neighbors mad at you, or a bunch of flies. Just keep a check on it, keep it moist, turn it every couple weeks, and by next year you could have some nice rich mulch to add to your new plantings. Ideally, you would want to start a compost heap in spring, that way you might have good dark soil by the next spring, but it will compost throughout the autumn and winter. There are even ways to compost indoors during winter months using a large Rubbermaid type tote and lid (read how here), and red worms. I've read about it being done in the basement, with no offensive odors at all. It's something to think about if you want to keep composting your scraps all year instead of trudging out in the snow and digging a spot to bury it.

And that's it! We actually got it all done in a little less than two hours! Start to finish. It was Noah's birthday the day before, so we wanted to leave town to visit his grandmother and go to dinner. We finished this, cleaned up and drove the hour to see her. We had a wonderful visit and dinner. It was a very full weekend, but very accomplished.
I hope this encouraged you to try your own compost bin. It's really not as hard as it may seem, and good for the environment too.
There are bins for sale, even by Rubbermaid through sites such as Walmart.com, but the whole idea is to make usable FREE nutrient rich soil for planting, and to reuse what you've got on-hand. This is a great way to teach your children nature cycles, recycling, planting and harvesting, and gardening.
Give it a try...see what you think!
Have a wonderful rest of the week...
N
I'll try to keep it as brief as possible... :)
Ok, remember the pallets from my last compost post? Well, we took those three and this is what we did.
We set them up 'tall' instead of short and stout in case the pile gets high through the fall with the mulched leaves. It looks a little funny, but that's what we decided to do. You can see it a few pics down. Anyway, Noah used a drill to first drill a long pilot hole in the wood. These pallets were so hard to get through. He did have to get his more powerful drill. We now recommend using thicker, stronger screws. Ours were 3" x 8mm. They worked well, but we had to go in from the back after this first initial try...


This worked so much better!


It really is nice and sturdy. We were going to use some rebar down the inside channels formed by the slats for stability, that's another reason we set them up this way, but it really is sturdy enough this way. This particular wood is so very heavy! We plan on making one or two more bins attached to this one. It's good to have a place to store your mulched leaves and grass clippings to add to your compost pile, and to start a new one after the first gets going really well, that way you can keep turning the first, and generate your broken down material, move that out and store it, and just keep it up by doing the same with the second bin, while making a fresh bin out of the emptied first.

I raked the old compost dirt bed out to get it ready...

Then I put down the first layer--the "brown" layer--old dried leaves. I found a really great step by step guide here, on composting.


I then spread out my "green" materials--food stuff. This is the heat-producing (rotting) stuff, and the reason I started composting. All my kitchen scraps go here instead of filling the trash with them. Leftover fruit and vegetable scraps, egg shells, teabags, some coffee grounds (and the filters, too!), all that stuff that will sit in your garbage disposal or trash smelling up your kitchen is great for your flower beds and vegetable gardens, so why not reduce, reuse, and recycle that, too?


A little yucky, but SO valuable...


I also needed "wet stuff". I dug through my old compost area and found the wet leaves and very broken down veggie matter to layer on top of the new pile. Moisture is important in your composting process, too. If it gets too dry, and your "green" items and old wet compost isn't enough to keep it moist, you can wet it every so often.

Be careful digging around in damp decaying areas...This guy climbed out just after I pulled up a few handfuls of the stuff above...


So...I layered my "wet" old compost on top of the food stuff, then added more of my starter soil as above...

Then another layer of grass clippings...

Then more starter soil...

Then more dried leaves...
You just have to keep adding to your layers, making sure the food stuff is covered well, in case of animals. You also want to keep a check on it for smells...if that fruit isn't covered well in the heat...well, it stinks! You don't want your neighbors mad at you, or a bunch of flies. Just keep a check on it, keep it moist, turn it every couple weeks, and by next year you could have some nice rich mulch to add to your new plantings. Ideally, you would want to start a compost heap in spring, that way you might have good dark soil by the next spring, but it will compost throughout the autumn and winter. There are even ways to compost indoors during winter months using a large Rubbermaid type tote and lid (read how here), and red worms. I've read about it being done in the basement, with no offensive odors at all. It's something to think about if you want to keep composting your scraps all year instead of trudging out in the snow and digging a spot to bury it.

I hope this encouraged you to try your own compost bin. It's really not as hard as it may seem, and good for the environment too.
There are bins for sale, even by Rubbermaid through sites such as Walmart.com, but the whole idea is to make usable FREE nutrient rich soil for planting, and to reuse what you've got on-hand. This is a great way to teach your children nature cycles, recycling, planting and harvesting, and gardening.
Give it a try...see what you think!
Have a wonderful rest of the week...
N
Sunday, September 2, 2012
Compost under construction...
We are s-t-i-l-l trying to get the compost area done. All that rain from the hurricane is keeping us washed out mostly. We are running in and out today, though. I'm trying to get the pallets screwed together, cleared the old compost out, mostly, and in the sprinkles, too. Could only take the camera out when it wasn't raining on me while I worked. It's getting there, but I need Noah's help...he just woke up from working last night, and has to leave in and hour and 15 minutes...I hate to ask him to help me, but those pallets are HEAVY!
Here are the pallets all lined up. We will use the one on the far left as the back and the two in the middle as the sides. We'll keep the one on the right for another project, or, if we get another one we'll make a double bin.


Another angle of the new cleared area...

Nothing like a 'helper' wandering around...No, No...carry on...don't mind the camera. Just trying to take pictures, is all...

Ahhh, Soph...just wait till I get started on her..... ;)

Check back soon, we'll have it done...Promise!
Here are the pallets all lined up. We will use the one on the far left as the back and the two in the middle as the sides. We'll keep the one on the right for another project, or, if we get another one we'll make a double bin.

The 'old' compostable material we have right now...

The start of the cleared area where we will set up the bins...

Another angle of the new cleared area...

Nothing like a 'helper' wandering around...No, No...carry on...don't mind the camera. Just trying to take pictures, is all...

Ahhh, Soph...just wait till I get started on her..... ;)

Check back soon, we'll have it done...Promise!
Thursday, August 23, 2012
New projects on the way
Noah brought me home some pallets that I had been wanting for so long.


Around here, they're not too easy to come by, so I want to use the few that we got for my most pressing needs first.
We've been wanting to revamp the compost area for so long, so we're pretty psyched to do that this weekend. I found a great post for building a cheap compost bin here, and it is exactly what I was thinking, based on an article I recently read.
This is the small pallet from the top of the pile above. I've never seen one this small. Noah wants to use it in the basement, but I think I can do something with it in the house. It's the perfect size for what we both want, I wonder who will win?

A close up of the numbers stamped on the ends of the one pallet. A shame to miss using those on something cool in the house, but I'll find more. I have great ideas I've found and pinned on Pinterest.

Stay tuned for what we use them for and a step by step of the new compost area! (and whether I convince Noah to let me have the cute small one for myself our house!)
Subscribe to:
Posts (Atom)