My most valued possession is my family. Even if you are living in a box
somewhere, and you have the love and support of your family, you will always be
wealthy. Love really is all you need. From love, great things will emerge. From
your thoughts, you can create greatness.This is what I need to remind
myself of everyday to be the best person that I can be. Live your life with
gratitude. Be thankful for all that you have everyday, even if it is your eyes
to see or your ears to hear or your feet to walk or your hands to create.
Understand your place in this Universe; how infinitesimally small you are, but
how huge a contribution your Spirit is. Don't wear blinders to the world around
you, you're not the only one here. Be kind, considerate, don't be judgmental,
love others, and yourself. Know that you are perfect inside; that you are
love.


Showing posts with label painting. Show all posts

Saturday, July 12, 2014

Side Table beautification using, you guessed it, Annie Sloan Chalk Paint®


Hello again!

I have one more Annie Sloan® project to share with you before I delve into the chairs I want to work on. There's so much going on in this house, I don't know when I'm going to be able to get around to them. Besides, I need the practice, so I'm starting small...

I also need to upload the photos from our Fourth and share where we enjoyed the fireworks this year. 

But, first, this table. Here is the only *before* photo I had, but you get the idea, right? This table actually came from my mom's house; I brought it home after she passed. It's just a cheap little table that I think she and my dad put together from a kit then stained and poly'd (quite heavily), but I couldn't part with it. It was still in great shape and it held sentimental value. 

I hadn't attempted to paint it in the two years I've had it, it just seemed like too much work. Now I know why...it was meant for Annie Sloan Chalk Paint®! I just had to wait until I discovered it and how easy it is to use.


So, here is the before:


And, here is the *After*:


And here is all the {in-between} 

Unfortunately, I don't have any progress photos. I sort of explain why that is at the end of this post...


To get the grasp on how to prep (surprise! There is none!) and paint this piece, you can check out my very first project using Annie Sloan Chalk Paint® paint.   

This time, though, I went ahead and purchased the medium sized Annie Sloan Paint Brush. All of the tutorials I have watched really praised the dynamics of this brush. I wanted to see for myself. I tried the flat brush I used in my last project, and the round ASCP brush. Lo and behold, the AS brush won out. It really did cover the best and the brush strokes were more random, unlike the "too uniform" flat brush. Does that make any sense? ASCP is meant to have texture, brush strokes, and look shabby chic. The beauty is, you get to choose just how shabby, or chic, you want your finished project. And, if you don't like it, you can just slap on another coat, and start all over again! (Which is what I actually had to do this time).


Take a look at the post linked for you above. Go ahead, I'll wait...

        You back? 
                Okay, so, after I put two coats on, with a very short drying time in between, I went ahead and sanded using my 220 sanding block. Now, you can wax it first for a less distressed look, or just go for it before waxing. I just advise to go slowly until you reach your desired effect. However, you can always go back over your project with a little more paint and start again from scratch.


This table came with a lot of detail that was perfect for sanding to show wear and tear. I just sanded all the edges, went over the screws, and along the grain on the table top and flat bottom piece. 


I went all around the table edge, lightly at first, then adding more distressing where I wanted it. 


I then waxed the whole thing. I used a soft wash cloth and the small stenciling brush shown in my last post.  I will be getting a waxing brush very soon, but for this project, I did ok with the smaller brush, as my surfaces were smaller, but for any bigger projects, I will need the ease of use that the waxing brush gives. I've seen a few on Amazon, or you can visit your local Annie Sloan stockist. Don't know who sells ASCP and supplies in your area? Just do a quick Google search!

As I brushed on the wax, I buffed it in and wiped off the excess with an old wash cloth. I let it set up over night before I set anything on it. You want to be sure to let it 'dry' all the way before you set anything atop your furniture, as the wax will still be soft and you probably don't want little *divots* in your surfaces. 


After it was dry, it was good to go. Or so I thought. I had these beautiful orange lilies (no pictures, sorry) that I separated from a larger bouquet that I placed in a vase on this table. Now, with this paint and waxing technique, you are supposed to be able to live with it as normal as a "dipped" piece of furniture. Practically indestructible. 

IF you wax it correctly. 

Which I apparently did not. 

I think I must have put too much wax on, or didn't buff it enough. It was a tiny bit 'sticky' when I was done, but it dried up really well. Maybe I just shouldn't have put one of the most pollen dropping flower I have ever had in my house on this table. Then again, maybe it's just the flower, and not my table. Apparently, you aren't supposed to rub or wipe the pollen off of the surface. (Learn how to remove your own pollen stains here).

Anyway, I did just that. And smeared it. A lot. Then I tried to wash it off with warm water and a cloth, a magic eraser, paper towels, all of which made it much, much worse. I even tried to lightly sand it out. When that didn't work, I just rolled up my sleeves and started sanding away. I just sanded the areas with the dark orange smears as much as I could. I knew I didn't have to go overboard, because, with the miracle that is Annie Sloan Chalk Paint®, you can just paint right over any mistake...wax or not. 

So, I did. I just opened my can, dipped my brush in a little, and swiped a little coat of paint right over the pollen stains. I set it in front of the window to dry, and rechecked it to be sure no stain was seeping through. It didn't, so I moved on to waxing. 

I just put a light coat on with the cloth and buffed it in really good. Let it dry, and it is perfect. No stains, no stickiness. And I'm able to set anything on it.

Well, I think I'll pass on the lilies....


I'm sorry I don't have more pics showing the process, but I didn't know how it was going to turn out. I wasn't even sure I was going to share it. But, I am happy with it, and I now have the practice, and confidence, to jump into those big projects that are waiting for me.

I can't wait to get the chairs done. We have a ton of other projects we need to get under way, including a kitchen, bathroom, bedroom...

But, I'll continue to share as we move along. I hope this encourages you to try this painting technique for yourself. It's so much fun, aside from being easy and quick. There's nothing like instant gratification!

Thanks for reading today and have a great weekend!


Nanette


*The opinions in this post are entirely my own. I have not received any compensation from Annie Sloan Chalk Paint® or any other company mentions in this post.

Friday, June 13, 2014

My Very First Go With Annie Sloan Chalk Paint®

Hi Guys!
I have been dying to get my hands on some of this stuff. I've heard about it for so long but never had: 

    1. the money (I thought, because you know I've spent $$ on stuff I could have otherwise been spending on this delicious paint) because at about $38 a quart, I was always too terrified guilty to buy it. Not to mention the wax, brushes, etc... 
                                                              
 2. the courage, because it looked way too involved with all those steps, and what the heck is "waxing" over paint, anyway...?  
                                  
 3. the projects. I have bought several wonderful pieces for WAY to little money at our local small town flea market, antique store, and second hand store. Yes, I said "little". I must be doing everything right, because wait until you see what I have, but that's for another post...It's just one more reason I love my little country town...


Anyway, last week we were in one of our absolute favorite places, Historic Down Town St. Charles (Missouri), to have lunch and as we left the cafe a little shop right across the street caught my eye. Toodaloo is a shop that specializes in repurposed furniture and lovely vintage and handmade finds. They also happen to be a stockist of Annie Sloan Chalk Paint® (ASCP). We had been in there before, and I browsed the chalk paint but was too shy to buy. This time I walked in with purpose. After talking to the lovely lady covered in paint (she was painting a large and beautiful dining table) I decided upon a can of "Old White", the most versatile of colors. I had already purchased some Minwax at Lowe's for other projects, so I thought that would be fine, and I didn't buy any brushes, either. I wanted to experiment first. 

So, I left with my purchase, it was about $42, tax included, and we headed for home. 


I knew what I wanted to do first, just to get a feel for the paint. I have a bunch of these resin candle sticks. I've had them for years, purchased in a group. I have 5 left, one fell and broke. I also got all of my mother's home decor after she passed, and she had a few of these in a light brushed gold color. I didn't get a picture of the two I actually painted because I literally just jumped right in as soon as I got home right there on my stove, but this is the exact color that they were; same group. 


Look at all that detail! I was so excited to get started... So excited that I forgot to show a few pictures of how I painted these. Maybe it's time I jump on the "YouTube" bandwagon. I painted these last week before I watched any tutorials. But after I painted the first one (with the WAY wrong brush) I searched out some tutorials. I found this great series from Blue Egg Brown Nest writer Christen Bensten on YouTube. I'm so glad I found this tutorial series (there are 5 videos in all for this tutorial on how she painted a dresser with ASCP) because I needed the instruction!


These are my candle sticks all painted up. The one on the right I painted with a sponge brush. *Sigh*...Don't do this. Just. Don't. Okay, it wasn't horrible because, as you can see, I got it painted, mostly. But, this paint dries fast. On your project; on your brush. But, if you've ever painted anything with a sponge brush before, you know the texture it leaves, and, with this pant, that's fine; you really kind of want a little texture, unless you want smooth, then you might want a different paint altogether ;) Anyway, the problem was that the sponge removes too much paint as you go. It doesn't leave what you want behind.
So, I watched a tutorial. Saw this big, fluffy, round, juicy brush being used...on a dresser. I'm doing candle sticks. That wouldn't work, even if I had one. But--I have a slew of paint brushes in my craft room, craft maven that I am ;)


There's my wicked little sponge brush...and my cheap little savior; the cheapest you can find. It came in a pack of multiple paint brushes, all different sizes and styles from Michael's or Hobby Lobby. You know the ones? Well, it worked just fine, for what I needed, but it shed like crazy. Last night I discovered another tutorial that I also found so helpful. Even though Christen (Blue Egg Brown Nest) said you could use a cheap brush from Home Depot, this second tutorial helped convince me with my "Yeeahhh, but...you've been doing this a long time, you could probably use any brush" mentality. Sort of a second opinion, if you will. You should check out her newly budding blog and her very informative and easy to follow YouTube tutorials. Her name is Christina--I just noticed both my little "inspirations" names are so similar and the same as one of my besties, too, lol--and her blog is Pretty Distressed. Her newest post was one of those "synchronisticmoments I'm always talking about. Anyway, you should check out her tutorials either here or on her YouTube. You won't be disappointed.

Okay, props given.
Next, I went into the "place-which-should-not-be-named"...the basement. I don't like our basement. Our house is 116 years old. It's dark, it's damp, the floor rafters overhead ceiling is low...no place for a girl.

But, down I went. I needed the wax and sandpaper. One thing that basement is? Organized. Thanks, Babe!


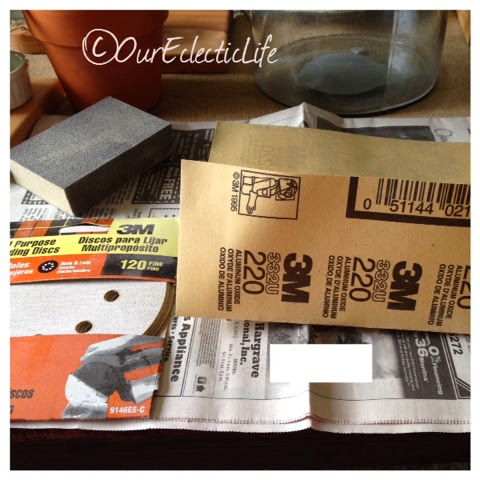
I grabbed a variety of what I thought I needed out of the "Sandpaper Drawer". A universal type sanding block that I could not find the grit # of on the packaging, a sheet of 220 grit sand paper, and I just grabbed some 120 sanding discs, just in case, because I didn't want to go back down there. I ended up using the sanding block and tore two little 2x2" pieces from the 220 paper for the little detail work.

I started out testing a few spots with the 220. It wasn't really strong enough. So I broke right into the sanding block. That did the trick, but I used a light hand, until I got the 'feel' for it. Then, for the smaller details, I used the little bits of 220. This will vary for each of your projects depending on how many coats you put on, how thick or textured you paint it and how distressed you actually want your piece. There will be some pieces I'll do that I won't want a lot of distressing on, so I'll either go very lightly on it or maybe not at all. There is no wrong way. Apparently you can just paint right over all of your mistakes, even after waxing. That's why Annie Sloan is an absolute genius in my eyes and my newest Hero.

Sand away until it feels right to you. I was doing such a small project, so I didn't wear a mask, but for more sanding, I just might. It doesn't create a lot of dust, but this paint is literally like chalk. Annie Sloan invented this in 1990, so it came way before chalk BOARD paint-not the same thing-so it is super soft and is just like shavings from an actual piece of white chalk. One thing to be careful of is your fingernails, if you have them. Watch that you don't scrape any of the surface with a nail as you are curving around with your sandpaper. I sanded on my dining room table over a news paper into a little bowl. The dust was heavy enough to fall right in. I also used the natural bristle brush I painted with to dust my piece as I went along (after I washed and dried it, of course).


Here are a couple detail shots of just how heavy or light you can go with your sanding. You can just nick away some of the paint so that only a little of the bottom color shows through, or go a little harder to get all the way down to the wood.


There are so many techniques to this, you really do have full creative control. Some will wax before sanding to take away less paint, some use the dark wax to distress a little more. I didn't have dark wax and was really just getting a feel for what I like, so these are the steps I used. Again, there's really no real 'right or wrong' from what I've gathered, so far, but I'm still learning...


When I was satisfied with the sanding, it was time to wax. I was a little scared, but getting braver all the while. After I watched the tutorials (that I linked for you above) and learned the ins and outs of the waxing process, I remembered I had these Martha Stewart stencil brushes. I bought them to stencil some pillows, but didn't really like the effect I was getting. Now that is something a sponge brush is good for. I went up and pick the two that I thought would work the best. There are several sizes in the pack of 6 or 7 brushes.


I opened my Minwax and discovered that, not only did it have a smell, it had a 'tint'. Not clear like Annie Sloan's. I was told by the clerk at Toodaloo's that the wax should be like Crisco. This was a bit harder than that...at first. But you know what? My brush rubbed around in it just fine. It was definitely soft enough. I just circled my brush around in it and wiped the excess off onto the side of the can from the side and 'bottom' of my brush.


I just started on the top of the candle holder, where the candle would sit, and circled the wax in. It went on exactly as the girls said it would. Though I could tell it was ever so slightly tinted, it didn't detract from the piece. I will be getting the AS Clear Wax very soon, though. I have some major projects coming up!


I would brush the wax in to an entire section, like the whole top, then buff it in with a rag. This is definitely where the elbow grease comes in. Even for this small project, it was a workout. I used a terry washcloth and that seemed to work just fine, but I'll use something softer next time. I am quite impatient and just wanted to grab what I had.


 It worked out well because I was left with exactly what I was promised.


I finished both pieces, buffed them very well, and put them out. With a bigger project, you will want to let your wax 'cure' for at least a day, but I found these to be hardened and there were no sticky or 'rubby' spots on it after a few minutes. The finish is hard as a rock.


Here are a few pictures of them incorporated into my decor. I just made those little felt flowers for the candles a few weeks ago. There'll be a post about those soon, so keep an eye out!


Wouldn't Annie Sloan Paint have been great on this Painted Photo Block project from a couple of weeks ago? I totally think so, too. The things we wish we would have known...


I had so much fun experimenting with this lovely new product. I absolutely can not wait to get going on some bigger pieces. I will give you a little sneak-peek of what I will be working on real soon...


I can't wait! Until next time, go check out those great blogs I linked up top and let me know what you thought about this post right down below there in the comment box...I'd love to hear from you!

Have a great weekend and Father's Day! Spend some time with the daddy's in your life making memories. That is the most important thing in life...

Thanks for reading,


Nanette

Wednesday, February 20, 2013

Monogram Front Door Wreath

Well, hello! Did you all have a good Valentine's Day? Noah and I did. Though I didn't take the night off, we went to a nice local restaurant and had a very romantic dinner and the most delicious glass of wine by the fireplace talking about our goals that we are wanting to accomplish this year. For a married couple who have been together this long, being this compatible in our goals and dreams is romantic!

Anyway, I finished the front door wreath that I had been planning on for weeks now. I love it! It was terribly easy and so cheap! Read on, and I'll tell you how I did it...


A little while back, on one of my trips to Hobby Lobby, I picked up this chipboard letter while they were on sale. It was about $2.50 at 50% off. Since I don't live near enough to one to go anytime I want, I try to stock up on what I know I'll be using soon while there's a sale going on. I don't want to buy a bunch of stuff that will just collect on a shelf, so I'm glad I live far enough away to plan my trips. That way, I always buy on sale and only buy what I'll be using eventually in the near future. And, since there are always sales going on, I know I won't miss anything and can plan and get it next time.

 So...I had the paint, paintbrush, and little plastic cups with lids on hand-$0.
 I removed the sticker from the front of the letter. (There were two-one on front, one on back. I can never figure out WHY they always do this.) Then I just painted a THICK coat of pewter grey onto the letter. Don't forget the sides and a little on the back. You can paint the whole back if you want, but once it's attached, no one will see that part, so do what ever strikes your fancy.

Then have yourself a Hersey's Kiss (or two!) while it dries... 


Then, once it was good and dry I painted the whole thing with a THIN coat of the white. I wanted some of the grey to show through and to really show up after distressing. I used a real hair paintbrush because I wanted the paint strokes to show. However, no matter what I did, and no matter how much I washed and tried to pull out the loose strands, it still "shed" all over the initial. It did come off when sanding, but was super frustrating during the painting process. I'll probably stick to my good 'ol sponge brushes next time and just try to 'dry brush' extra paint (like the grey) for distressing.


While that was drying completely ( I even popped in the 300* oven for a couple minutes to 'cure' it and make sure it was REALLY dry...but watch it every second, it is made of paper!) I assembled my artificial flowers. Now here's the fun part. While shopping with my sister Saturday, I was at HL and was looking for just the right flowers. They have beautiful artificial flowers, and are always on sale, but that was still more than I wanted to pay, especially since I was going to take them apart. My sister told me to try the Dollarama we have right in town, she said there were great flowers there. So Sunday I ran uptown and found these beauties. All for a dollar a piece. $6!

I simply pulled the flower heads off the stems and they came right off, staying fully intact. Some I really had to cut the stems off because I wanted to glue them flat onto the letter, so I  reinforced those with hot glue, but that was it. The rest stayed intact and had enough stem to push down into the wreath. These were a great find!

I just layed them out where I wanted them, sticking them into the wreath and then picking them up one by one, adding the hot glue, and placing them right back where I wanted them. Easy peasy!


I had bought this grapevine wreath at Michael's a couple months ago, and used my 40% (or even 50%, I can't remember) coupon and it was around $5.


This is the initial for our last name after sanding and distressing. I used a scrapbooking sanding block because it's so easy to hold and has different grades of sandpaper on each side. It worked SO well.


Here are some close-ups of the details I got on the corners and edges after sanding. You can see the grey and the chipboard brown showing through nicely. I'm glad it turned out so well. It's really like an MDF type material and I have never used this before so I didn't know what to expect.


After all the flowers were glued on, I glued the "S" right onto the wreath. I had already layed everything out where I wanted it, so I could assemble everything easily and I would know where the flattest spot was on the wreath for the letter. Then I took a couple of the left over flowers, cut them close, and glued them onto the letter for visual interest to round out the design.

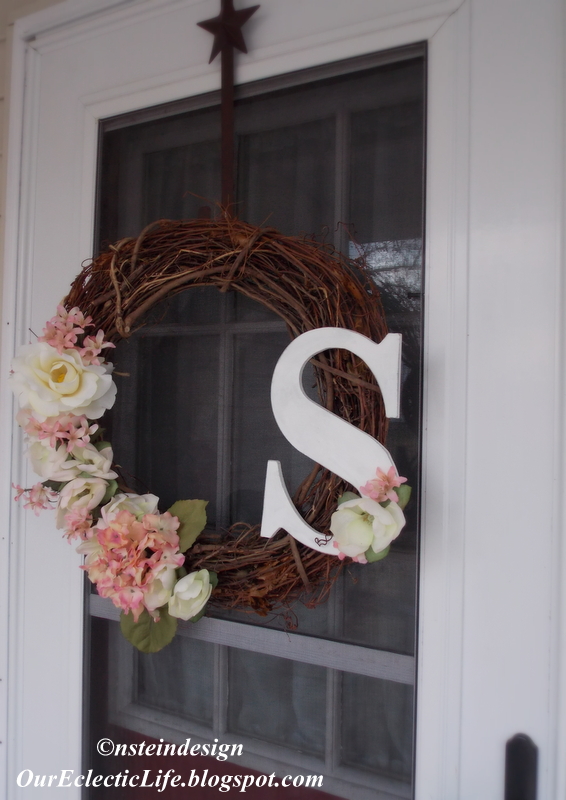
Here's the finished product. It makes me so happy when I pull into the driveway! It's vibrant and just a lovely thing for the door. I hadn't really wanted any pink at first, I wanted all white, but after looking at the dollar store and found these, they all went together so perfectly. Now I can't imagine not having a little pink! I is my favorite color, after all!


This is a Pinterest inspired project, of course, and you can see what inspired me here. You can find a lot of inspiration there for a million projects for your home on the cheap. I'd be delighted if you would follow my Pinterest boards. I have a follow button just in the upper right of my blog page. If you haven't already, it's worth a sign-up. But, I warn you, it's ADDICTING!!

Thanks you so much for reading today, I hope this project inspired you to try something beautiful for your home.

Have a great rest of the week,

Nanette

Saturday, January 26, 2013

Winter shots and January outdoor pillow covers

Well, hello, there!

How have you been? Surviving these cold winter months (if you live in that climate, that is)? How about the start of a new year?

Well, I guess it's sort of the end of the start of the new year, huh? I, like many of you, have been busy, as always, but I've still been working on some projects. I can't wait to get started on the really BIG ones, though. I've got some fabulous chairs to refinish, some tables, a bench...a lot on our plates, all while Noah is still remodeling and refurbishing things in the house, like the 116 year old staircase we are re-doing (we wouldn't be if it hadn't already been done with boards, not stair treads, in the 80's). So there is a lot of measuring and cutting going on behind me right now, as a matter of fact...

Anyway, I finally got my winter outdoor pillow covers done, almost just in time to change them for Valentines day, but I finished them Monday. Of course, like all my others, they are playing double-duty. I'm showing you the January/winter side now, and will reveal a surprise in February.

I am hopefully also finishing up some stenciled throw pillows for my couch later today, and I will share those with you soon, as well.

So, I pretty much made these the same way I made all of the others in my Fresh outdoor Autumn porch decor post. I just lay my pillows onto the fabric I want to use and trace with a disappearing ink pen. Before I sew them together I figure out what I want to decorate the front with and assemble all of that on and sew that to the face of the pillow, then I sew them up leaving a very sturdy hemmed opening at the bottom to remove the pillow for storage. I like to use twine for the closures and just hand sew knotted pieces of that evenly spaced to tie shut.

*(View the photos in a separate gallery by clicking on them for better views and to page through like a slide show.)


First I wanted to share with you a few shots I got after the rain froze on our greenery...so pretty...


Now for the pillows...

I wanted to do a white on white neutral pillow using a natural winter theme. I took some of my greenery from the baskets outside (I've left all of the greenery minus the Christmas decor for January in the hanging baskets outside). None of it dried out as of yet due to the rain and soil that's in them, so I had nice flexible branches. I had never done this before so I practiced a little. I definitely wanted the stem of the branch to be in the image and wanted it in white so I poured out some white acrylic craft pain and sponged it on. The first try dried too quickly, as acrylic paint tends to do, so I didn't have the greatest transfer of my image. I mixed in a little water and worked quickly and I think it turned out pretty good. It's a little heavy on the paint in spots, but I decided I kind of liked that. It has a very organic handmade look. Just what I was trying to achieve, really.


I wanted a little more than just plain raw-edged Osnaburg as my decoration, so I decided to pull out some white satin ribbon and detail the edges. I glued the ribbon on, tucking the ends for a tailored look, using Liquid Stitch (it really works!) and let that dry. When that was dry, I decided I wanted a little more of a natural earthy feel to off-set the delicacy of the ribbon, so I pulled out the twine that I was planning on using as the tie closures and measures four pieces long enough to tie together into knots at all four corners. I glued the knots down a bit and let them dry for a few, then sewed each one on with a zig-zag setting on the machine using a neutral colored thread. (I know, I know...a bit more trouble than I thought, especially for an outdoor pillow, but I had a vision, ok? :)


As for the vintage toolbox and lantern...I just left the greenery and pine cones in and left it natural, neutral and wintry.


I just thought it was important this year to keep something fresh and colorful (or natural) on our porch even in these winter months. It gets dark so quickly, and is so cold some days you don't even want to go outside. So, when we do have to go out, and while we are longing for warmer days, it's nice to come home to a welcoming porch, I think!

How have you been beating the 'winter blues'?  Any projects in mind? Anyone out there lucky enough to be taking a vacation somewhere sunny and warm?

Well, that's it for now, but I've got some Valentines projects under way and I can't wait to share them with you! Do you have any special plans in mind for the Most Romantic Day of the Year?

As always, thanks for stopping by and have a great weekend...(and don't forget to stop by my sister blog confessionsofathinkaholic-ns.blogspot, I've just posted some new stories to warm you up)!

Nanette