My most valued possession is my family. Even if you are living in a box
somewhere, and you have the love and support of your family, you will always be
wealthy. Love really is all you need. From love, great things will emerge. From
your thoughts, you can create greatness.This is what I need to remind
myself of everyday to be the best person that I can be. Live your life with
gratitude. Be thankful for all that you have everyday, even if it is your eyes
to see or your ears to hear or your feet to walk or your hands to create.
Understand your place in this Universe; how infinitesimally small you are, but
how huge a contribution your Spirit is. Don't wear blinders to the world around
you, you're not the only one here. Be kind, considerate, don't be judgmental,
love others, and yourself. Know that you are perfect inside; that you are
love.


Showing posts with label wreaths. Show all posts

Wednesday, June 18, 2014

A Burlap Wreath For All Seasons


Hi there!

Here's a project I did this past fall (I know, I know...) and I wanted to share it with you (finally)!

Better late than never, though, right?

It's actually a wreath that can easily be transformed to fit whatever occasion you need because it's so easy to change up!

The things I used were really quite simple to come by. I like to try to pick up some rolls of burlap whenever I am at Hobby Lobby. It's cheap ($4.99 for the natural color, but they sell other colors, too and if you happen to have a 40% off coupon...why not get some?) and they keep it stocked. 

Even Walmart has been stocking this now in different widths, colors, and even patterns, but I'm sure with the massively growing popularity of burlap, you should be able to find it anywhere. Bridget, of LittleLovelyLeaders.blogspot.com, a blog for teachers, made the tutorial I used and she got her burlap from Michael's.

Anyway, my point is, I've always got some on hand. I also had the brown chenille ties, so that's what I used to hold it all together. The only thing I had to go out and buy was the metal wreath form. That was at Walmart for just a couple of bucks. 

That's it! No glue, and hardly any scissor use, except for cutting up the chenille stems into 3rds...
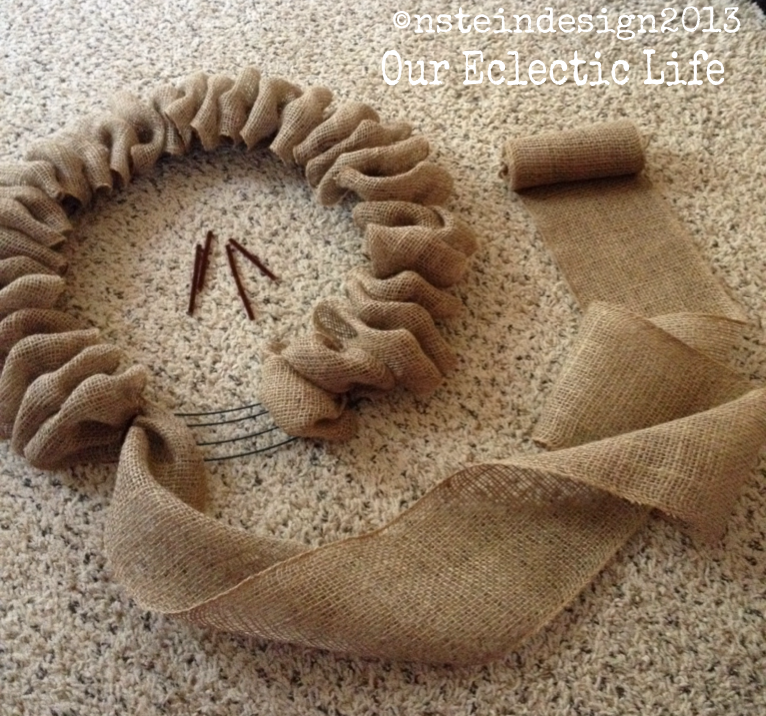

I got a little ahead of myself before I took the first picture, but you get the idea of what the wreath form looks like, right? 
This is how I attached my burlap...

I didn't use as much burlap as Bridget's how-to, so my instructions are a wee bit different than hers. If you don't have as much burlap ribbon on hand, or want to save a little money, this is what I did.

I followed the tutorial exactly and attached the end piece of my burlap to the wire using a piece of the chenille tie by poking it through the burlap on either side of the wired wreath form and twisting it tightly in the back.

Then, I just scrunched up the burlap, making loops in the size that I wanted, and attaching those as close to, or as far away from, the last piece that that I had tied onto the form with a chenille stem, until it looked good to me. I just sort of pinched my burlap, pushed the chenille through the holes in the fabric and slid it up and down on the wreath form until I liked where it sat, then just twisted the chenille tightly in the back to secure.


Here is a back view of what the chenille looks like from behind. When you make your loops, you want to make sure the next one is attached at least close enough to hide the stem on the last loop. Make sense? 
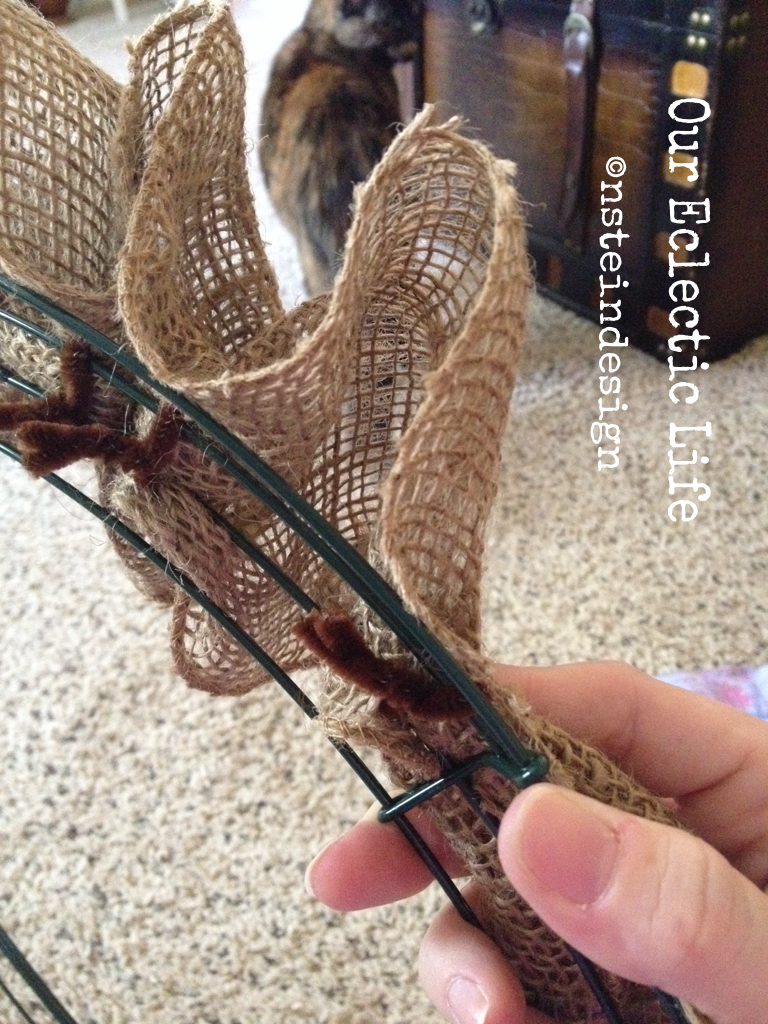

This is what it will start to look like. Mine is not as full, because I didn't use as much burlap, but I'll show you how I fixed that without using a ton of rolls and driving up the cost of this project!


Amazingly, I only used one roll of burlap, and this is how I did it.

I knew I wouldn't have enough to make it evenly full all the way around with just one roll, so, I gauged how much I needed as I went along. I won't lie...I did make a couple of adjustments along the way. Then, when I got back to where I started, I simply started to twist the roll on itself, like you would crepe paper streamers, and loosely wrapped it back around the wreath sort of filling in where it needed it and making sure to cover any visible chenille stems. 


When I got to the end, I poked a stem through the underside of the "tail" end and attached it to the wreath form, making sure it was hidden (even though it's the back side, I don't care for 'unfinished edges').
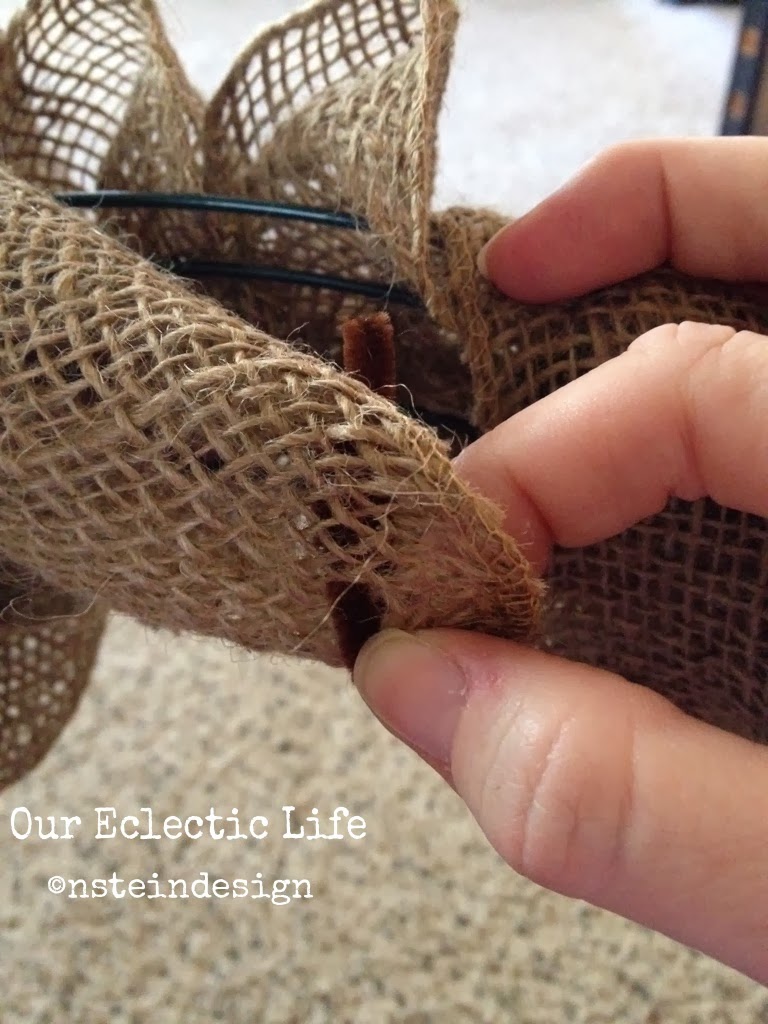

I twisted it onto the form and tucked it under another fold of the fabric.


                                                                   All hidden away!


Here's the back side of the wreath with the twists of burlap covering the chenille ties and exposed metal wreath form...


And here's the front all filled in! 
I just fluffed it up and it's ready to decorate.


Next, what to decorate it with?

It was Autumn and I had just gone on my yearly pumpkin and gourd picking trip with my sister. There is a little farm that grows a wide variety of  squash and sells it roadside for cheap! It's in a little town about 40 minutes from us, but the drive is lovely and I love helping a local small business out. 

Aside from all the unique pumpkins and gourds, they had this beautiful shellacked Indian corn. There were so many beautiful colors and bundles, I couldn't decide!


I finally picked this bunch; it was the most colorful.

The corn was already bound together with heavy gauge wire, so I just wrapped jute twine around the wire a few times to hide it and worked some twine through the wired wreath form to tie it on. After making sure it was sturdy, and a few adjustments for aesthetics, I tied a little raffia around it and I was done! 

The whole thing was easy to hang onto a wreath hook because the wire wreath form was so compatible. 


                                                      Just look at all those beautiful colors!


What also sold me on this bunch was the fabulous striations of purple throughout the husks! Just beautiful...


 Each piece is like a little fingerprint...no two are alike...


Is anyone else as excited as I am about each little kernel of this corn?! 


Call me crazy, but I think it's beautiful ;)


If you've been longing for a burlap wreath of your own, I hope you will try making this for yourself. It's not as hard as it may seem and is quite cost effective, since you can change it up to match whatever decor you are into at the time, so it's really worth it. Let me know if you decide to try one and send me a picture of how you decorate it!


I want to say thank you to Bridget, at Little Lovely Leaders for her original tutorial on this burlap wreath how-to. Be sure to drop on over to her blog for more great ideas!

Thanks for stopping by today, and have a great week.

Nanette


* All opinions are my own. I receive no endorsements from any sponsors mentioned in the above post:     Hobby Lobby, Walmart or Michael's.

Tuesday, June 3, 2014

Vintage Book Paper Wreath

Hello again!

I hope you had a great weekend enjoying the beginnings of Summer. I wanted to share another post from a few months ago of this great vintage book paper wreath I made at Christmas time. I searched through my favorite craft pinning site (a gold star for whoever guesses what that is) and came across several beautiful wreaths to choose from. I picked this one from jadeflower. I put my own twist on it and this is what I came up with. 

For some reason this year I had a little trouble remembering to take photos of the step-by-step processes I took for many of the crafts I have posted. Shame on me. Really, though, because that's the most important part. I guess I was just so harried for time, I forgot. I'm usually a stickler for these things, just look back in the blog and see for yourself. Go ahead...I'll wait...

You back? Find anything you like back there? I hope so! 

Anyway, I'll try to make it up to you with my future posts. I've got a lot coming up. There might be a French chair make over, a couple of side table make overs, a couple of cane back chair re-do's...like I said, I've got plenty of opportunities to make it up to you. 

This wreath was originally made for the Holidays, but I have left it up in my kitchen (away from the stove so it doesn't get splattered) since Christmas and it still 'works'. 

I went to a yard sale the Autumn before and bought up a bunch of their books on the last day, right before close, so they were an absolute STEAL! Now, I don't necessarily condone damaging books, but these were yard sale finds and were already pretty old and damaged. I bought several that I kept for entertainment, as well, though.

Anyway, I got all of my materials ready that I needed for my wreath:

* Tons of book pages. You want to make sure you have plenty on hand to go through so there is a variety of page colors, edges, and actual prints to choose from. (note the fox, chapter numbers and titles I worked into the folding process)

* Glue gun and glue. In the tutorial link above, she used a glue stick. This is fine, it will hold. But, from my scrapbooking days, eventually anything I glued with a stick came loose after a while. Tacky glue will definitely hold-forever-but I just love my glue gun. The only thing I don't care for is the 'strings' you have to watch out for. I'm a bit of a perfectionist and I will pick every string off of a project. It's just unsightly to show your glue. 

* Scissors, circle cutter, punches, embellishments, chipboard letter, craft paint and paint brush, glitter...anything you might want for your center, IF you want one. There are tons of beautiful wreath tutorials out there without centers. Even some to look like Dahlias. I'm SO doing those next!

* Cardboard or another sturdy base for your rolls

* Mono filament (fishing line), twine, ribbon, string. Anything you like to hang your creation.

* A small square of felt to cover your glued-on hanger

Here is the wreath in all it's glory. Scroll on down to learn how I did it. Again, I'm truly sorry I did not think to take pics during my process. I'll be working on another project soon so I'll make it up to you...promise. In the meantime, search these out on the web. There are some fabulous girls out there with great blogs! (uh...just don't go too far, ok? ;)


Ok, first thing you want to do is roll your book pages. I experimented with the size I wanted. I used a large hardback book. I took it apart first, so that my pages would be free, trimmed off any glue left from the binding, and separated them a little by color. Some older books yellow with age, and I love that, but some of the pages within the same book don't do this. I just sort of flipped through it and separated them. When I had a good pile of pages, I started to roll. Now, this wreath is pretty darn big because I used a large book. The smaller the book, the smaller the wreath, obviously. But, I did try to trim the book pages down a bit to make the wreath a little smaller. You have to trim equally on the bottom and the one side that won't show as much, so that it doesn't look like they've been trimmed. This didn't work out the way I'd hoped. You're better off just using different sized books. And the fact that it was hardback vs paperback does not matter at all. Just get one and start crafting!

Figure out which pages you want to use, like what chapter numbers you like, any pictures, words, titles, etc. Then you roll the paper like a paper cone, starting on one corner. Put a small dab of glue after you make your initial roll to secure, and roll it up. You can go as tight or loose as you want, you'll figure out what you like, and I put a little glue along the ridge where the side of the page lay against the roll. One down, A LOT more to go! Hey, it's meditative...and relaxing! If anything, you'll get a lot of thinking done. Put on some music or catch up on a show while you roll...


Next, is the assembly. You want to cut a circle of cardboard as a base that your rolls will be glued to. Then you want to lay those rolls out before you glue to make sure everything fits. Ok, here's where a leetle frustration might come in. Don't get scared. When you are laying things in a circle, like these rolls of paper, it might take a few tries to get them to lay where you want them. You need to figure out how far 'in' to the circle you need to go to fit them all in snugly and with as few gaps a possible. Sometimes this is near impossible because of the size of your circle and the size/number of your rolls. If you play around with it, it will work out, but you don't want to start gluing until you at least do a dry run first. 

In my photo below do you see how there appears to be two layers of rolls and cardboard? It's the only way I could fill in the gaps that I couldn't fill in with my initial layer. I laid it all out in a way that was pleasing to my eye and that looked even and symmetrical. But, still there were gaps that I couldn't quite fill with more rolls. So, I glued it down this way. Then I identified where the gaps were, flipped the whole thing over, and glued the few extra rolls to the back of the first cardboard circle, to fill it in. I must say, after I was done, the wreath was fuller, and you can't even tell it was a "mistake". I used the mono filament for a hanger. I did use hot glue for this, as well, but you can use tape or anything you like. If you use hot glue, you have to be careful because it will melt your filament. I measured my length of filament so that it would not show while hanging, tied the two ends together a couple of times to get a good sized knot, and put a dab of hot glue right on the cardboard. I let that set up for a few seconds and placed my filament, knot side down, into the glue. I had cut a small square of felt to cover this and glued that down over the knot, as well. Then I made a second cardboard circle to cover the back for aesthetic reasons and glued that right over the second layer of rolls. 

Whew! That part is done!


Here's the back all finished and glued. You could even cover the cardboard with paper or felt if you wanted, but you never see it, so why not save a step? This wreath is work enough, right?


Alright, now for the embellishment. I folded a cute little paper medallion out of a smaller page. I learned how to make these from searching Pinterest and founds this tutorial from cityfarmhouse.com. I didn't use as many pieces of paper, just two, but it was all I needed for this wreath. I just "fan folded" two equal sized pieces of paper, as shown in the tutorial, and glued them together. This time I did use the Tacky glue. I also glued the folds where I felt they might spread out too far. While I let that dry, I made my center. I played around with colors and ideas and settled on this. I used a circle cutter and cut this circle out of black textured cardstock. I put a little Tacky glue on some scrap paper and rolled the edge of the black paper lightly in it, then I rolled it in some vintage German glass glitter. While I let that dry, I used a scalloped paper punch to cut a second circle of cream cardstock. I have a bunch of chipboard letters so I painted our initial with black craft paint. I punched a little butterfly from a piece of the scrap book paper left over and when all the pieces were dry, I assembled it all with Tacky glue. I then glued the finished medallion to the wreath with hot glue. 


Done! I just LOVE it. I recently went to the local antique shop uptown and came across some very old books of sheet music. I have seen a lot of fab projects using old music pages, but wondered where in the world I was going to find some. It was my lucky day, because I came away with a bunch. Can't wait to show you what I do with that!


I really hope you try one of these for yourself. The results are stunning, and it's not really as hard as it looks. And you can start smaller, or just make ornaments for your tree, packages, wall art...it's endless.

I'm so excited about these types of paper projects, I just might dedicate a whole post to introducing you to some fabulous blogs out there with the most beautiful and easy projects to fill your summer with...and get a head start on the holidays! Wouldn't that be nice? Having things done months in advance for Christmastime? Less messin' = less stressin'!

Have a great week and as always, thanks so much for being here. I truly appreciate you.

Nanette


Wednesday, February 20, 2013

Monogram Front Door Wreath

Well, hello! Did you all have a good Valentine's Day? Noah and I did. Though I didn't take the night off, we went to a nice local restaurant and had a very romantic dinner and the most delicious glass of wine by the fireplace talking about our goals that we are wanting to accomplish this year. For a married couple who have been together this long, being this compatible in our goals and dreams is romantic!

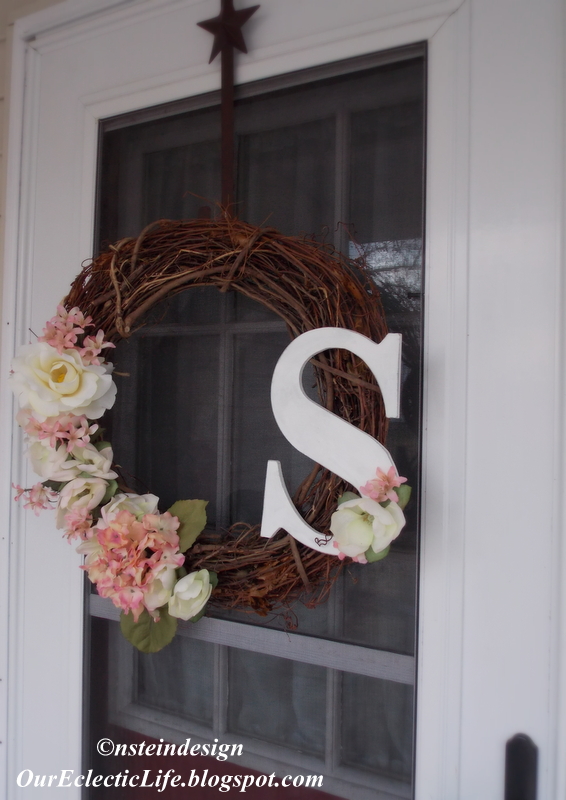
Anyway, I finished the front door wreath that I had been planning on for weeks now. I love it! It was terribly easy and so cheap! Read on, and I'll tell you how I did it...


A little while back, on one of my trips to Hobby Lobby, I picked up this chipboard letter while they were on sale. It was about $2.50 at 50% off. Since I don't live near enough to one to go anytime I want, I try to stock up on what I know I'll be using soon while there's a sale going on. I don't want to buy a bunch of stuff that will just collect on a shelf, so I'm glad I live far enough away to plan my trips. That way, I always buy on sale and only buy what I'll be using eventually in the near future. And, since there are always sales going on, I know I won't miss anything and can plan and get it next time.

 So...I had the paint, paintbrush, and little plastic cups with lids on hand-$0.
 I removed the sticker from the front of the letter. (There were two-one on front, one on back. I can never figure out WHY they always do this.) Then I just painted a THICK coat of pewter grey onto the letter. Don't forget the sides and a little on the back. You can paint the whole back if you want, but once it's attached, no one will see that part, so do what ever strikes your fancy.

Then have yourself a Hersey's Kiss (or two!) while it dries... 


Then, once it was good and dry I painted the whole thing with a THIN coat of the white. I wanted some of the grey to show through and to really show up after distressing. I used a real hair paintbrush because I wanted the paint strokes to show. However, no matter what I did, and no matter how much I washed and tried to pull out the loose strands, it still "shed" all over the initial. It did come off when sanding, but was super frustrating during the painting process. I'll probably stick to my good 'ol sponge brushes next time and just try to 'dry brush' extra paint (like the grey) for distressing.


While that was drying completely ( I even popped in the 300* oven for a couple minutes to 'cure' it and make sure it was REALLY dry...but watch it every second, it is made of paper!) I assembled my artificial flowers. Now here's the fun part. While shopping with my sister Saturday, I was at HL and was looking for just the right flowers. They have beautiful artificial flowers, and are always on sale, but that was still more than I wanted to pay, especially since I was going to take them apart. My sister told me to try the Dollarama we have right in town, she said there were great flowers there. So Sunday I ran uptown and found these beauties. All for a dollar a piece. $6!

I simply pulled the flower heads off the stems and they came right off, staying fully intact. Some I really had to cut the stems off because I wanted to glue them flat onto the letter, so I  reinforced those with hot glue, but that was it. The rest stayed intact and had enough stem to push down into the wreath. These were a great find!

I just layed them out where I wanted them, sticking them into the wreath and then picking them up one by one, adding the hot glue, and placing them right back where I wanted them. Easy peasy!


I had bought this grapevine wreath at Michael's a couple months ago, and used my 40% (or even 50%, I can't remember) coupon and it was around $5.


This is the initial for our last name after sanding and distressing. I used a scrapbooking sanding block because it's so easy to hold and has different grades of sandpaper on each side. It worked SO well.


Here are some close-ups of the details I got on the corners and edges after sanding. You can see the grey and the chipboard brown showing through nicely. I'm glad it turned out so well. It's really like an MDF type material and I have never used this before so I didn't know what to expect.


After all the flowers were glued on, I glued the "S" right onto the wreath. I had already layed everything out where I wanted it, so I could assemble everything easily and I would know where the flattest spot was on the wreath for the letter. Then I took a couple of the left over flowers, cut them close, and glued them onto the letter for visual interest to round out the design.

Here's the finished product. It makes me so happy when I pull into the driveway! It's vibrant and just a lovely thing for the door. I hadn't really wanted any pink at first, I wanted all white, but after looking at the dollar store and found these, they all went together so perfectly. Now I can't imagine not having a little pink! I is my favorite color, after all!


This is a Pinterest inspired project, of course, and you can see what inspired me here. You can find a lot of inspiration there for a million projects for your home on the cheap. I'd be delighted if you would follow my Pinterest boards. I have a follow button just in the upper right of my blog page. If you haven't already, it's worth a sign-up. But, I warn you, it's ADDICTING!!

Thanks you so much for reading today, I hope this project inspired you to try something beautiful for your home.

Have a great rest of the week,

Nanette

Friday, February 1, 2013

Valentine's Pillow Covers and Wreath


Hello! Hope your week is going great for you, so far.
Monday I finally finished up my little Valentine's Day wreath. The pillows have been done since January, because I always like my pillows to do double-duty so I can just flip them around when necessary. It really saves time and space. Less to change out and pack away! I made them the very same way I make all my pillow covers. You can see a quick tutorial here of the original pillow covers I made for Fall and the flip side of these covers for my winter/January decor right here.


I used muslin as the material for the front and back cover, and a red and white ticking for the front decorative panel, and sewed that to the muslin. Then I used some creamy white chenille fabric and some burgundy wool felt for the hearts. I just cut those out and placed them where I liked them, pinned them to the ticking and sewed them on. I was then able to sew the two panels together, leaving a good enough sized opening at the bottom for my pillow to be slipped in. While it was still inside out, I folded the hem of the opening over and pinned it and sewed that to make a good sturdy hem for the closure. I turned it right side out, and hand-sewed the twine on for the tie closures. All this is detailed in my winter pillow cover post.


Don't you just LOVE these flowers?! I found a tutorial of these on that Pinning site...you know the one. Here's the link to her blog Ruffles and Stuff, where I learned all about making them. It is a CUTE little blog!


Anyway, I picked through my fabric stash (I love fabric and buy a yard or two when it's on sale whenever I get around to getting to a fabric store and quite have the impressive bookcase full little stash!)
I decided on what reminded me of sweetness, romance, love, and Valentine's Day!


 I made them over the course of a week or so while watching telly or having a "crafting moment" on the weekend and made enough for the projects I wanted to complete for February. I will be making a lot more for next months wreath that I want all year 'round on the front door with our initial and some of these flowers in a larger scale. I'm working on that this weekend!


 I had been milling over what type of wreath to make for the front door for a while, and I was actually just going to buy one of those ready made store-bought hearts with all the sparkly red tinsel hearts on it and froo-froo it up, but my husband didn't really like that idea. Truth. He had an opinion about the Valentine's wreath.
So, I had this grapevine heart wreath for ever and I just decided to pull off the out of date stuff that was on it and use it for my wreath. Kinda perfect, right?

I started to just pull the old dried flowers off, the hot glue was so old it just popped off without damaging anything. I know it might seem pack-ratty to keep everything, but I have craft closets, and I don't really have that much. Just stuff that will save me a ton of money if I don't have to re-buy it. Do you know how much grapevine wreaths can be? I have a bundle of them that I got at a yardsale for next to nothing, HUGE ones, and all I had to do was take the old decorations off.

 
Ok, back to the dissasembly...and enter my "helper". She is just about the most curious cat there is. Loves the sound of tape being torn from anything and will climb a mountain to get it. Completely disarms you of your needle and thread if you are trying to so much as sew a button (like tonight) to eat your thread, and of course, she must try the grapevine stems of your wreath if you happen to be working on the floor. Not that a table would stop her.


Oh, yeah...she rolled all in the discarded dried stuff, too. And tried to eat it. And attack it. She's pretty spunky for a 13 year old.


I'm sorry I don't have any assembly pictures, but I can walk you through it. It's pretty self explanatory. I definitely wanted to use the flowers I made, and wanted to incorporate the word love somehow. I found a box of red glittery chipboard letters that I had. They were the perfect size. I would have loved to use that new burlap garland I just bought , but I couldn't figure out how to incorporate it. Plus, I wanted this to be light and airy. I had a bunch of tulle I bough on sale just before Christmas so I cut a long strip of that and weaved it through the wreath. It seemed made for something to be weaved right through there, so that worked out, too.


Then I tried my letters out until I found the right spot for them and hot glued those down.


Next, I started laying the flowers around until they looked right. I had more white ones than anything else and one teeny tiny flower, so I placed them by the "L" to use all the flowers and ballance the look. When I decided on the placement, I just hot glued all of those down, as well.


I really like it! It's not what I was thinking of at first, but I don't think I really knew what I was thinking of. It matches my pillows and I finally used a wreath I've had for years that I didn't know what to do with. The best part about all of these projects...it was all free!!


I truly hope you have a wonderful Valentine's Day. If you're a couple, do something nice together. It doesn't have to cost a thing! Make dinner together from a new recipe topped off with a special dessert you both made, and watch a romantic movie at home. One of our favorites is "The Notebook".  If you are parents, take your kids to the movie or have a movie night at home. Look online for Valentine themed party ideas and play some games and make treats with your kids. If you're single, get together with some of your single friends and go to dinner, or a winery, or have a dinner party at home. Watch a goofy, funny, sappy romantic movie like "Date Night" and laugh together. Or treat yourself to an evening of shopping or a trip to the salon. A quiet night at home curled up with a book with the ringer and television off or a glass of wine and an old black and white like "Casablanca" is a great way to treat yourself. No matter what you decide to do, treat yourself, and others well, and spread some Love!


                   Have a great week! Have a great Valentine's Day! Eat some chocolate!!

With Love,

Nanette

“How do I love thee? Let me count the ways.
I love thee to the depth and breadth and height
My soul can reach”
Elizabeth Barrett Browning