My most valued possession is my family. Even if you are living in a box
somewhere, and you have the love and support of your family, you will always be
wealthy. Love really is all you need. From love, great things will emerge. From
your thoughts, you can create greatness.This is what I need to remind
myself of everyday to be the best person that I can be. Live your life with
gratitude. Be thankful for all that you have everyday, even if it is your eyes
to see or your ears to hear or your feet to walk or your hands to create.
Understand your place in this Universe; how infinitesimally small you are, but
how huge a contribution your Spirit is. Don't wear blinders to the world around
you, you're not the only one here. Be kind, considerate, don't be judgmental,
love others, and yourself. Know that you are perfect inside; that you are
love.


Showing posts with label decor. Show all posts

Saturday, October 4, 2014

The Remodel: Days 5 through 8 or 9-ish...


Whew! My goodness...I've been so busy I haven't even had time to share! Sorry 'bout that. We've moved along pretty well in the last few days completing the vital parts of the reno. We did have to send the right and left side of the counter tops back to the store--they were too long. Now, I'm not going to fault anyone, but our measurements were pretty precise; I think it was just an oversight. It happens. At least they were too long and not too short. Easy fix (I hope). We just have to wait another week to get them back before we can put them together.

Anyway, here are the next few steps that we have accomplished so far and there are many more to come...


Here are a couple of pictures of each side of the floor where we thought there was the dreaded black mold. Thank God we were wrong--just stained sub floor...
We had removed the worst part of the flooring replacing it with a sheet of 3/4" plywood until the floor installers came back. They cut out and tore up the linoleum covered lauan and we worked on the dry rotted floor later that night to ready it for them to put in the nice new flooring the next day, but more about that in a bit.


In some of the above pictures you can see that there is plastic covering the wall. The hubby cut that back and we bought some green board drywall to cut and fill in the space.  


Looking better already, don't you think? Next, the hard work was about to commence. We had to rip out what should have been a 4x8 foot section of that terrible floor. We got out the pry-bars and hammers and got to work...


Some of it was rather easy to tear out because it was so dry-rotted, and some was really nailed down with 20 year old nails. And that floor underneath? It's 116 years old...


Looks pretty good for it's age. It held up where the "new" floor did not.


Then we had to fill in the newly made hole with 3/4" tongue and groove sub floor. Noah had used the circular saw to cut the sections of the floor that did not want to budge, and we ripped that out with the pry-bars, but we were not able to get it to a 4x8 size. So, he just cut the plywood to size: a perfect 4x6 foot piece. It fit like a glove, and he got high praise from the carpenters!

Noah: 1    Hideous floor: 0


Here's a candid shot of how we work. I was snapping pics of him working and I got this. He aimed the screw gun at me and made a "Thbbbffft" sound. Nice. At least we weren't fighting.


Here are the precise cuts the floor installer cut around the plumbing. Now, usually you really would not want to put your bottom cabinets on top of your flooring (I've been told), but we had not had the bottom cabinets in yet, so he didn't know where to run the floors up to (as in up to the edge of the bottom of the base cabinets), does that make sense? I asked him about this and he said it's really because they (Installers/product specialists) worry about the weight distribution sitting on the floors. But, he said my refrigerator was a monolith, and the cabinets are distributed evenly and the counters aren't heavy stone, so he was not worried. If he's not, then I'm not. Besides, the work is guaranteed and under warranty (not that I ever want to go through this ever again. Ever.) and I love the thought of everything sitting on an extra layer between the basement and my cabinet bottoms. After smelling the musty basement air rising up from above for all these years, I'm grateful.


Another angle of the cuts around the plumbing. That looks gross, but it's just glue...


All nice and clean. A big improvement from a few days earlier.


Here is a shot of our back room. It's the addition part of the house added in 1989. It holds our laundry room and bathroom (that remodel is for another day). It was the final room to have the floors installed. They used the same 3/4" tongue and groove sub floor to level the floors out to each height difference, and got to work.


Here is a shot of the kitchen from the back room...


And here is the finished product. Of all the boxes of flooring, that is all we have left. Always keep your leftovers for repairs, if ever you should have one. It will save a trip to the store later, plus, you never know when the manufacturer will discontinue that particular product.


Finished. And I love it. We have since moved into fixing the sink (even though the counters are not all together--we'll just settle it in for good when they do come in), picking our house colors (finally!), and painting the living room (at least). We will start to bring in our stuff from the storage pod this week and weekend, paint the foyer and back room and hopefully start on clearing out our bedroom and bathroom for the next phase of the "Remodel." Oh, and we want to visit Noah's grandma, too.

It's going to be a very busy weekend...

Thanks for reading here, and have a great weekend, yourselves!

Nanette


Monday, September 22, 2014

Day 4: The Remodel Continues

Hi there! 

Welcome to day 4 of "The Remodel." By day three I was definitely feeling like I was never EVER going to do anything like this again. Hanging cabinets, with just two people, most days, was not fun. Then came the worry about whether or not we were going to get the carpet in the living room up in time. After all, we didn't even have the room cleared out, let alone totally packed up, yet. So much to do in one day. I was losing my motivation...and my hope.

Que my wonderful sister. When she found out that we were changing our floors,she asked what we were going to do with all of our carpet. It was not old, at all, and we like to save as much 'moolah' as possible on these types of things. Plus, I abhor the thought of all that carpet and padding going to a landfill. So it was a win-win. She needed carpet for her daughters bedroom and other projects, and I need to be as environmentally conscious as I could. Speaking of being environmentally friendly, remember how I said in my first post that we were going to donate our cabinets and counters? Well, we still are, but amazingly, our neighbor stopped by with his dad from out of town who was visiting for our Harvest Fest, and wanted some of them. He took some to make a work station out of in his work shop. I had just put them on my "curb" like I said and, viola! Works every time. We will keep the three cabinets that fit above the stove, fridge and microwave for some other projects we want to do, and donate all the rest.

So, why was I having those feelings of regret about ever doing a remodel again? Ugh...yesterday, the day before and last night was exhausting. No joke. For a minute I was worried that all my lovey-dovey Facebook posts about how well Noah and I were getting along and how cordial and compatible we are was jinxing us. It seemed like a ridiculous amount of work was needing to happen...laying in wait. To destroy us and prove us wrong.

Well, it was tough, tiring, maddening at times, but we pulled it off. It smoothed out before we knew it. Luckily. Thankfully. And I am SO grateful. Follow along below for a pictorial play-by-play of the last couple of days...


These are our old cabinets. Custom made in 1989. I know this because when we were carrying one of them out it was stamped "Inspector 12 1989." Solid wood doors, heavy MDF shells. That is our sad attempt at lightening up the kitchen by painting the uppers. We never got around to painting the lowers because we knew that someday we would be replacing them. It just happened to take y-e-a-r-s.


Cabinets all down on the one side! Boy, were they heavy!


Our first cabinet is up! Whew! So far, we are getting along fabulously! Team Stein, all the way! And it wasn't really hard at all...


Second corner cabinet up, and it's partner. Not too bad. Except...why is it so hard to find the studs in these walls? A stud finder? Useless. While I was pretty confused and a little mad that they cut out the drywall behind the sink base before install (why...?) and replaced it with plastic instead of green drywall, I became totally ok with it when I was able to find the studs and measure over the 16" to find the next ones for the screws. Now, why didn't they do that when they put those up in '89? Because the didn't. Not all of the screws were in studs. A majority were in drywall. Then, they just screwed the cabinets together. Sometimes they put screws on top of screws. Noah had a real good time getting those out...


All during the daylight hours yesterday we hung most of the upper cabinets. MOST. (This pic is actually from today because last night I would have thrown the camera). It was nothing like the show "Renovation Realities", at all! Not snapping at me to "hold it straight!" or me yelling at him to "hurry up!" It was more like "I got it, Babe. You just do your tool man thing" and him asking "You got it, Love?" and "You alright, Love?" Then we had to run to the home improvement store because three cabinets were wrong. And we needed three right cabinets. And a fourth one that wasn't even there. Plus some green drywall, plywood, screws, shims, knee pads (for my date with the 500 staples in the living room) and I think that was it. Then it was back home to put the remaining cabinets up, pull staples and tack strip, rip up the damaged floor that we thought had black mold (it didn't!!!), fix said floor, put up drywall...oh yeah, and eat an egg salad sandwich because I hadn't eaten all day. It was 7:30...


Well, we got most of the cabinets up. We couldn't get the one next to the fridge or above the fridge up. We were literally so exhausted neither of us could keep it held up. By now it was 9:00. Noah had the plywood cut at the lumber department so all he had to do was cut out the section and screw in the wood. While he did that, I took to the staples. Fun. Do any of you have a dog? Our dog will be 11 in February. She doesn't know this. To her, she is 2. She acts like a two year old; puppy and human child. I couldn't get anything done without appeasing her first. I had to get her bed out, give her a rawhide bone to occupy her. Get her a 'baby'. She had to know what I was doing at ALL TIMES. I'm shocked she didn't get a staple in her foot. I swept as I went. I was exhausted just from her...


We did as much as we could and finally called it quits at 11:30, took our showers, and decided sleep was well deserved. We got to bed at 12:30 with the plan to get up at 6;30. The floor installers were coming in the morning and we had to finish getting all the tack strip up, staples out, tons of stuff out of the foyer, kitchen and living room...this is where the regret started to creep in. How were we ever going to get this done? Were we going to be scolded when they showed up? Did we do enough prep work? The guy who came to measure for materials said to have the bottom cabinets in. Oops.


This is the floor before Noah ripped up the bad lauan and linoleum. We were terrified we would find black mold under there. But it was just dry rotted plywood. Easily fixed. And fix they did. We will take out the worst section of the floor and replace it with the 3/4 inch sheets they delivered, but the installer and his son got rid of the rest of the floor in a heart beat today. My absolute new BFF's.
Yuck.


Here's the living room floor, staples and all. Now, a very important story needs to be told here. Remember how I told you my sister was taking my carpet? Well, she brought my niece and nephew, their boyfriend and girlfriend, three male buddies and an extra girl over to pull up that carpet and pad. But, first, they cleared out my front room of the remaining furniture, boxes, this-and-that's, and even loaded some of our furniture into my brother-in-law's truck that we were borrowing to take to a climate controlled storage unit until we put the house back together. I have several precious antiques I will not part with, and they must stay safe! I am forever grateful to those kids! Wow... 

We did get up at 6:30/7:00 and dove right in to those staples and tack strip. Noah beat me, of course. When the installers showed up, there was no scolding. He was very laid back and said we hadn't needed to put in the lower cabinets, after all. The day went smooth, and they've done a great job, so far. They'll be back again tomorrow to finish up. 


My new art form I am discovering. I call it "construction is a dirty job."


Oh ma goodness. I have waited 10 years for this moment. These floors are the most beautiful thing. Laminate gets a bad rap sometimes. It used to look, and sound, cheap and hollow with really fake looking wood grain. But, as picky as I am, I totally approve of this. The handscraped look is just what I wanted, and the grain is beautiful. I didn't want to use hardwood, unless it was bamboo, and we just could not justify the expense. These are 10mm thick, the thickest you can get, I think. And they are wonderful. 


And Sophers loves them, too!


All-in-all, this had been a good experience. No bickering between the Hubs and I; we make a great team. Tyer, too. He's really been pitching in. We are all either getting over colds (me), fighting a lingering one (Noah) or just starting one (Tyler). I think we are doing a bang up job. I've waited so long for this, I can't believe it's actually happening!

Ok...gotta go! There's a lot of work to do...We still have to replace a bigger piece of the kitchen floor, put in the drywall for behind the sink, and who knows what else.

Oh! Before I forget...I bought a dishwasher today! Our first one! I am SO excited!!!

Thanks for sharing in this with me. Your comments and questions are always welcome, I'd LOVE to hear from you!

Until next time

Nanette


Friday, September 19, 2014

The Remodel: Day One

Hi friends,

Well, today the floors, cabinets and counters are getting delivered. I'm (not-so-secretly) hoping to get a little sleep in this morning before they do. I worked last night and I am still recovering from the "cold-that-won't-quit." As the day to getting into the nitty gritty of it all in this kitchen grows ever nearer, so does our anxiety. Noah has taken out one cabinet.

One.

Now, I'm not criticizing him. All the cabinets are detached from the counter, just the sink is left to detach, and we do need to wait until the last moment to haul all of the cabinets and counters out or else we wouldn't have anything to set the beloved Krueg on, or fix anything to eat or drink, and we'll be without that convenience soon enough. My point is: he has only removed one cabinet, a base cabinet farthest from the sink, along the wall adjoining the back room. It has no water source anywhere near it. At all. And, yet, what he found back there behind the baseboard scares me to death. Que mystery track here...
Dun...
      Dun...
           Dun.....


Black mold.

Not a lot, and it was superficial enough for him to clean up himself with bleach and fans. We were told by a contractor that if it is not a large area we could test it with bleach by wiping it away and air drying it with fans (wearing a mask and gloves, of course). If the drywall stays "clear" and does not re-stain, then you are ok to proceed. If it does stain or appear to come back-call in a professional-STAT!

*Please note: we are not professionals. We are not giving you advice on removal of mold or any other hazardous material. Call your health department or local HAZMAT office if you have one. This is merely our experience, and we are not trying to "cut corners" to save money. Being safe should always come first. We got the advice of a professional, whether that advice was sound or not for us is our experience and I am just sharing that experience with you here. You, however, should always seek professional advice.

So, we have no idea where it came from. The 116 year old basement, maybe? If so, we are looking at a professional basement drying and waterproofing team along with mold removal. Can't wait to see how much that might run...First, we will move the stove and the other cabinets, one at a time and take a look behind the baseboards. It could have come from under the sink. There had been a leak under there when we bough the house. We had it inspected and nothing came back on the report, but the linoleum was tinged a slightly darker hue in front of the sink. Then a few years later we had another leak that we fixed, but could never afford to rip out all of the cabinets and floor and repair or replace any of that, as it would require a whole new floor, bottom cabinets and counter tops. Or, at least we never thought we could.

That's why I'm mostly writing about this remodel, now. If we had had the confidence to know that we could achieve whatever we put our minds to, we would have fixed some of the things that needed fixed and replaced years ago, before it got too far gone, costing us potentially more in the long run. If we had had the confidence in ourselves that we could manage a remodel like this, a little at a time, instead of becoming overwhelmed at the thought and instead  managing ourselves toward that goal, we could already be halfway there instead of living for nearly 10 years with the dream of a reno instead of the reality of one. I'm not saying we lived in shambles for 10 years. We put in new carpet, painted the whole inside of the house including changing out all of the trim to white, and cosmetically changed the bathroom a few years back, but that has all since become outdated to us. Now that we actually do have the money to do all the things we've dreamed, we are going to, especially if it helps us sell for top dollar later.

I am really hoping that this is not a major mold issue, because if it is, we must have a professional come in to contain it, and we would need to repair studs, joists and whatever else is affected by it. That is a cost I really do not want to have to cover.

Boy, I can't wait to dig into the bathroom...

Oh! The floors are here...gotta go!


YAY LOWES DELIVERY GUY!!


Hey, keep checking back for more, there will be a ton (I hope...IF I'm not run asunder by the weight of  "The Remodel" that is...Dun...Dun...Dun...)

Ok, well, I've got some work to do. Until tomorrow...

As always, thanks for stopping by!

Nanette


*Note: I received no endorsements from Lowes for anything said in this post

Saturday, July 12, 2014

Side Table beautification using, you guessed it, Annie Sloan Chalk Paint®


Hello again!

I have one more Annie Sloan® project to share with you before I delve into the chairs I want to work on. There's so much going on in this house, I don't know when I'm going to be able to get around to them. Besides, I need the practice, so I'm starting small...

I also need to upload the photos from our Fourth and share where we enjoyed the fireworks this year. 

But, first, this table. Here is the only *before* photo I had, but you get the idea, right? This table actually came from my mom's house; I brought it home after she passed. It's just a cheap little table that I think she and my dad put together from a kit then stained and poly'd (quite heavily), but I couldn't part with it. It was still in great shape and it held sentimental value. 

I hadn't attempted to paint it in the two years I've had it, it just seemed like too much work. Now I know why...it was meant for Annie Sloan Chalk Paint®! I just had to wait until I discovered it and how easy it is to use.


So, here is the before:


And, here is the *After*:


And here is all the {in-between} 

Unfortunately, I don't have any progress photos. I sort of explain why that is at the end of this post...


To get the grasp on how to prep (surprise! There is none!) and paint this piece, you can check out my very first project using Annie Sloan Chalk Paint® paint.   

This time, though, I went ahead and purchased the medium sized Annie Sloan Paint Brush. All of the tutorials I have watched really praised the dynamics of this brush. I wanted to see for myself. I tried the flat brush I used in my last project, and the round ASCP brush. Lo and behold, the AS brush won out. It really did cover the best and the brush strokes were more random, unlike the "too uniform" flat brush. Does that make any sense? ASCP is meant to have texture, brush strokes, and look shabby chic. The beauty is, you get to choose just how shabby, or chic, you want your finished project. And, if you don't like it, you can just slap on another coat, and start all over again! (Which is what I actually had to do this time).


Take a look at the post linked for you above. Go ahead, I'll wait...

        You back? 
                Okay, so, after I put two coats on, with a very short drying time in between, I went ahead and sanded using my 220 sanding block. Now, you can wax it first for a less distressed look, or just go for it before waxing. I just advise to go slowly until you reach your desired effect. However, you can always go back over your project with a little more paint and start again from scratch.


This table came with a lot of detail that was perfect for sanding to show wear and tear. I just sanded all the edges, went over the screws, and along the grain on the table top and flat bottom piece. 


I went all around the table edge, lightly at first, then adding more distressing where I wanted it. 


I then waxed the whole thing. I used a soft wash cloth and the small stenciling brush shown in my last post.  I will be getting a waxing brush very soon, but for this project, I did ok with the smaller brush, as my surfaces were smaller, but for any bigger projects, I will need the ease of use that the waxing brush gives. I've seen a few on Amazon, or you can visit your local Annie Sloan stockist. Don't know who sells ASCP and supplies in your area? Just do a quick Google search!

As I brushed on the wax, I buffed it in and wiped off the excess with an old wash cloth. I let it set up over night before I set anything on it. You want to be sure to let it 'dry' all the way before you set anything atop your furniture, as the wax will still be soft and you probably don't want little *divots* in your surfaces. 


After it was dry, it was good to go. Or so I thought. I had these beautiful orange lilies (no pictures, sorry) that I separated from a larger bouquet that I placed in a vase on this table. Now, with this paint and waxing technique, you are supposed to be able to live with it as normal as a "dipped" piece of furniture. Practically indestructible. 

IF you wax it correctly. 

Which I apparently did not. 

I think I must have put too much wax on, or didn't buff it enough. It was a tiny bit 'sticky' when I was done, but it dried up really well. Maybe I just shouldn't have put one of the most pollen dropping flower I have ever had in my house on this table. Then again, maybe it's just the flower, and not my table. Apparently, you aren't supposed to rub or wipe the pollen off of the surface. (Learn how to remove your own pollen stains here).

Anyway, I did just that. And smeared it. A lot. Then I tried to wash it off with warm water and a cloth, a magic eraser, paper towels, all of which made it much, much worse. I even tried to lightly sand it out. When that didn't work, I just rolled up my sleeves and started sanding away. I just sanded the areas with the dark orange smears as much as I could. I knew I didn't have to go overboard, because, with the miracle that is Annie Sloan Chalk Paint®, you can just paint right over any mistake...wax or not. 

So, I did. I just opened my can, dipped my brush in a little, and swiped a little coat of paint right over the pollen stains. I set it in front of the window to dry, and rechecked it to be sure no stain was seeping through. It didn't, so I moved on to waxing. 

I just put a light coat on with the cloth and buffed it in really good. Let it dry, and it is perfect. No stains, no stickiness. And I'm able to set anything on it.

Well, I think I'll pass on the lilies....


I'm sorry I don't have more pics showing the process, but I didn't know how it was going to turn out. I wasn't even sure I was going to share it. But, I am happy with it, and I now have the practice, and confidence, to jump into those big projects that are waiting for me.

I can't wait to get the chairs done. We have a ton of other projects we need to get under way, including a kitchen, bathroom, bedroom...

But, I'll continue to share as we move along. I hope this encourages you to try this painting technique for yourself. It's so much fun, aside from being easy and quick. There's nothing like instant gratification!

Thanks for reading today and have a great weekend!


Nanette


*The opinions in this post are entirely my own. I have not received any compensation from Annie Sloan Chalk Paint® or any other company mentions in this post.

Wednesday, June 18, 2014

A Burlap Wreath For All Seasons


Hi there!

Here's a project I did this past fall (I know, I know...) and I wanted to share it with you (finally)!

Better late than never, though, right?

It's actually a wreath that can easily be transformed to fit whatever occasion you need because it's so easy to change up!

The things I used were really quite simple to come by. I like to try to pick up some rolls of burlap whenever I am at Hobby Lobby. It's cheap ($4.99 for the natural color, but they sell other colors, too and if you happen to have a 40% off coupon...why not get some?) and they keep it stocked. 

Even Walmart has been stocking this now in different widths, colors, and even patterns, but I'm sure with the massively growing popularity of burlap, you should be able to find it anywhere. Bridget, of LittleLovelyLeaders.blogspot.com, a blog for teachers, made the tutorial I used and she got her burlap from Michael's.

Anyway, my point is, I've always got some on hand. I also had the brown chenille ties, so that's what I used to hold it all together. The only thing I had to go out and buy was the metal wreath form. That was at Walmart for just a couple of bucks. 

That's it! No glue, and hardly any scissor use, except for cutting up the chenille stems into 3rds...


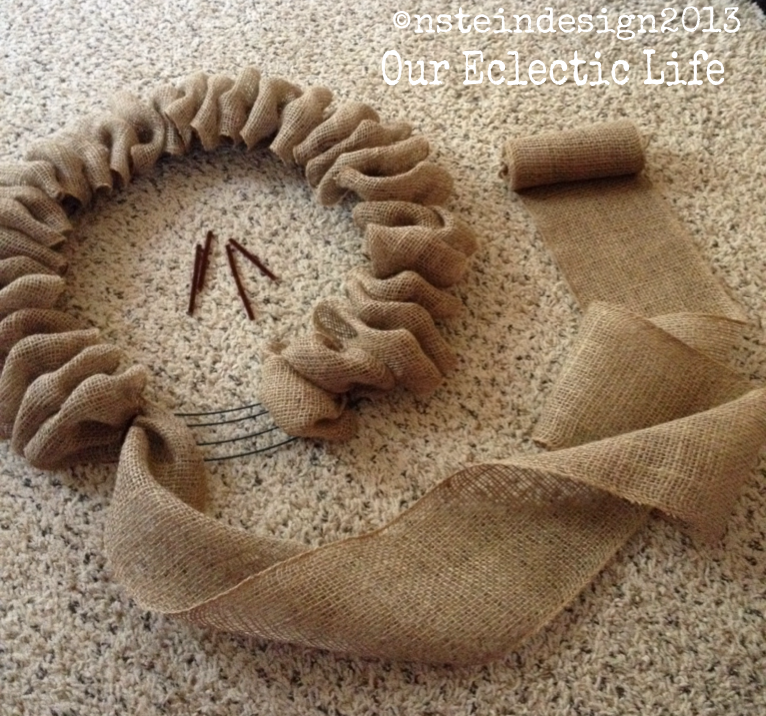
I got a little ahead of myself before I took the first picture, but you get the idea of what the wreath form looks like, right? 
This is how I attached my burlap...

I didn't use as much burlap as Bridget's how-to, so my instructions are a wee bit different than hers. If you don't have as much burlap ribbon on hand, or want to save a little money, this is what I did.

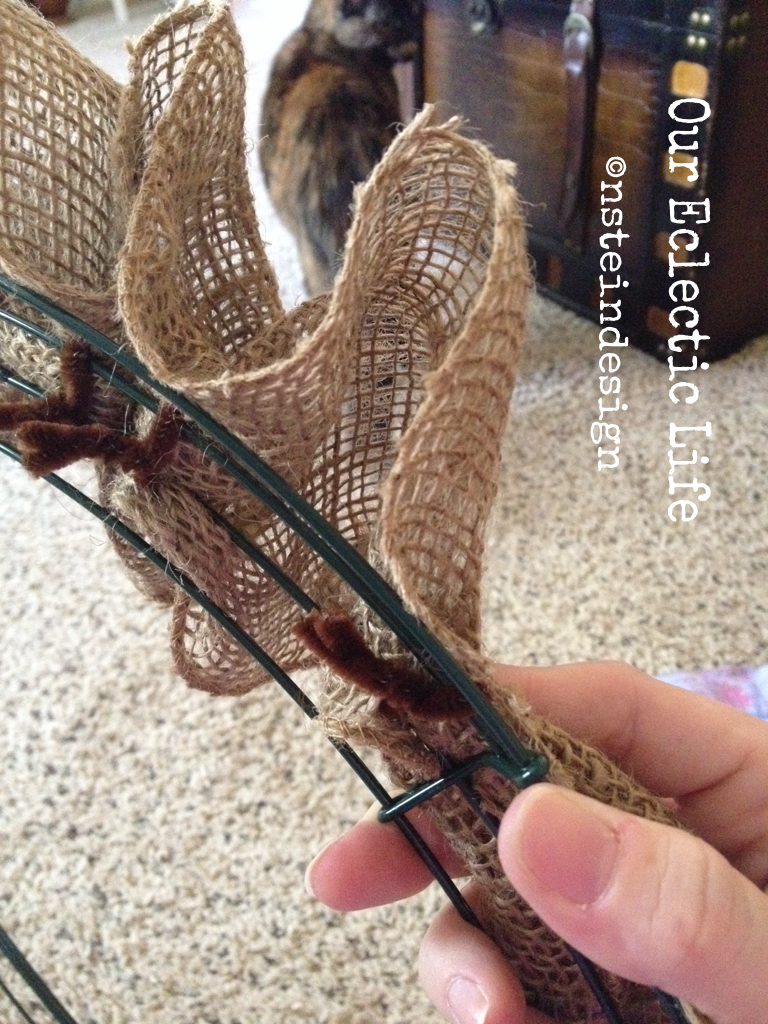
I followed the tutorial exactly and attached the end piece of my burlap to the wire using a piece of the chenille tie by poking it through the burlap on either side of the wired wreath form and twisting it tightly in the back.

Then, I just scrunched up the burlap, making loops in the size that I wanted, and attaching those as close to, or as far away from, the last piece that that I had tied onto the form with a chenille stem, until it looked good to me. I just sort of pinched my burlap, pushed the chenille through the holes in the fabric and slid it up and down on the wreath form until I liked where it sat, then just twisted the chenille tightly in the back to secure.


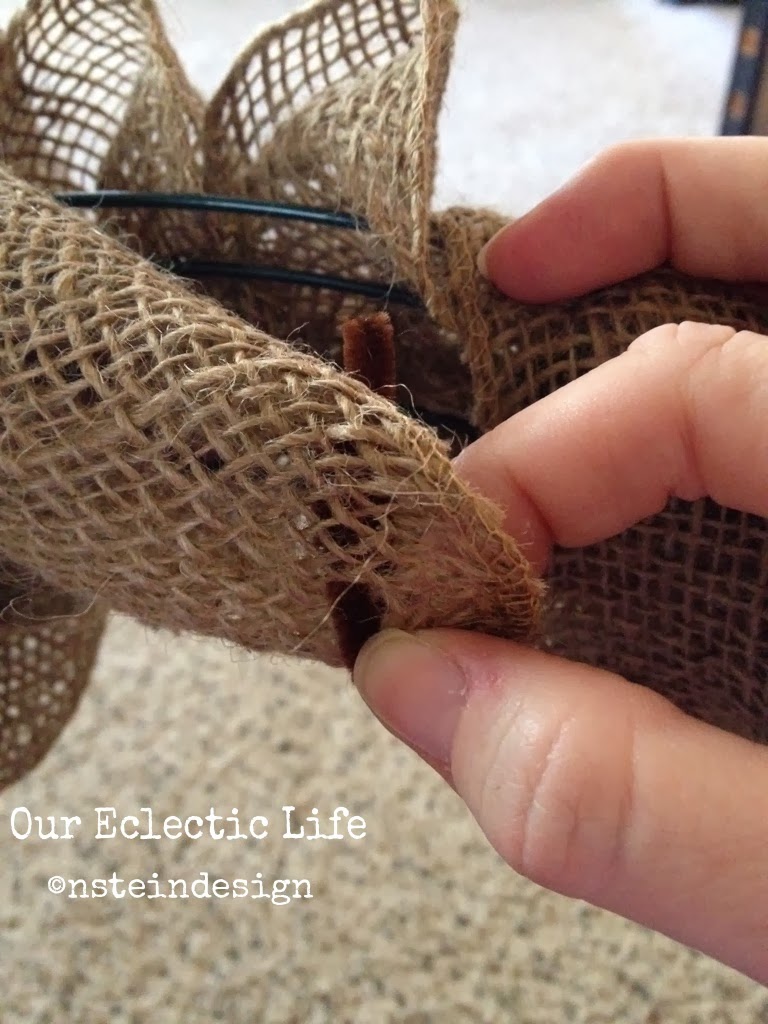
Here is a back view of what the chenille looks like from behind. When you make your loops, you want to make sure the next one is attached at least close enough to hide the stem on the last loop. Make sense? 


This is what it will start to look like. Mine is not as full, because I didn't use as much burlap, but I'll show you how I fixed that without using a ton of rolls and driving up the cost of this project!


Amazingly, I only used one roll of burlap, and this is how I did it.

I knew I wouldn't have enough to make it evenly full all the way around with just one roll, so, I gauged how much I needed as I went along. I won't lie...I did make a couple of adjustments along the way. Then, when I got back to where I started, I simply started to twist the roll on itself, like you would crepe paper streamers, and loosely wrapped it back around the wreath sort of filling in where it needed it and making sure to cover any visible chenille stems. 


When I got to the end, I poked a stem through the underside of the "tail" end and attached it to the wreath form, making sure it was hidden (even though it's the back side, I don't care for 'unfinished edges').


I twisted it onto the form and tucked it under another fold of the fabric.


                                                                   All hidden away!


Here's the back side of the wreath with the twists of burlap covering the chenille ties and exposed metal wreath form...


And here's the front all filled in! 
I just fluffed it up and it's ready to decorate.


Next, what to decorate it with?

It was Autumn and I had just gone on my yearly pumpkin and gourd picking trip with my sister. There is a little farm that grows a wide variety of  squash and sells it roadside for cheap! It's in a little town about 40 minutes from us, but the drive is lovely and I love helping a local small business out. 

Aside from all the unique pumpkins and gourds, they had this beautiful shellacked Indian corn. There were so many beautiful colors and bundles, I couldn't decide!


I finally picked this bunch; it was the most colorful.

The corn was already bound together with heavy gauge wire, so I just wrapped jute twine around the wire a few times to hide it and worked some twine through the wired wreath form to tie it on. After making sure it was sturdy, and a few adjustments for aesthetics, I tied a little raffia around it and I was done! 

The whole thing was easy to hang onto a wreath hook because the wire wreath form was so compatible. 


                                                      Just look at all those beautiful colors!


What also sold me on this bunch was the fabulous striations of purple throughout the husks! Just beautiful...


 Each piece is like a little fingerprint...no two are alike...


Is anyone else as excited as I am about each little kernel of this corn?! 


Call me crazy, but I think it's beautiful ;)


If you've been longing for a burlap wreath of your own, I hope you will try making this for yourself. It's not as hard as it may seem and is quite cost effective, since you can change it up to match whatever decor you are into at the time, so it's really worth it. Let me know if you decide to try one and send me a picture of how you decorate it!


I want to say thank you to Bridget, at Little Lovely Leaders for her original tutorial on this burlap wreath how-to. Be sure to drop on over to her blog for more great ideas!

Thanks for stopping by today, and have a great week.

Nanette


* All opinions are my own. I receive no endorsements from any sponsors mentioned in the above post:     Hobby Lobby, Walmart or Michael's.