My most valued possession is my family. Even if you are living in a box
somewhere, and you have the love and support of your family, you will always be
wealthy. Love really is all you need. From love, great things will emerge. From
your thoughts, you can create greatness.This is what I need to remind
myself of everyday to be the best person that I can be. Live your life with
gratitude. Be thankful for all that you have everyday, even if it is your eyes
to see or your ears to hear or your feet to walk or your hands to create.
Understand your place in this Universe; how infinitesimally small you are, but
how huge a contribution your Spirit is. Don't wear blinders to the world around
you, you're not the only one here. Be kind, considerate, don't be judgmental,
love others, and yourself. Know that you are perfect inside; that you are
love.


Showing posts with label shabby chic. Show all posts

Wednesday, May 28, 2014

Painted Photo Block With Handmade Flowers


Hello friends,

I thought I'd share with you what that white block sitting behind the roses in the last post is. For this past Christmas I made these as gifts for everyone. Well...my female family members, anyway. I was searching around on Pinterest and came across this post from Shanty-2-Chic. There were several great ideas for quick and easy, not to mention very affordable, gift ideas. You can see for yourself right here.

I altered mine just a little bit, you'll see how, but not by much. These were so easy! So, here's the secret. I went to Lowe's with Noah (of course) where we bought an 8 foot by 12" board. I don't remember how much it was...but it was pretty cheap, considering how many gifts I got out of it. I asked the associate to cut it into 12" lengths. (...psst! they do this for free...FREE!) Anyway, I got 7 blocks out of that one board. Plus 2 "end" pieces that I will use for another project. Easy peasy. And so much better than hauling an 8 foot board home, right?


So, when we got home, Noah took them down into the basement and spray painted them white for me. *Be sure to paint in a well ventilated area. Spray paint dries very quickly, especially on a porous wood like pine. Just be sure to paint in a well ventilated area. He paints A LOT so he has a ventilation system set up. Two light coats, fronts and sides only. When they were dry, it was my turn.

Here are the materials I used:

* the painted wood block                       * hot glue gun/hot glue and epoxy (I use Gorilla Glue)
* twine                                                    * photo clips (found at Hobby Lobby/scrapbook supply)
* buttons or brads of your choice           * fabric flowers (I'll show you how below)


First, after the paint is good and dry, use a light to medium grit sandpaper to lightly sand the edges and all four corners. This gives you a shabby chic worn look. There is always the option of "dry brushing" some grey paint or even using some of your scrapbooking chalk or distressing inks on the edges and corners after sanding. I didn't because I liked the clean white look.


Next, you are going to wrap your twine around the block to hang your photos on. I took my roll of twine and held the piece in the corner and just sort of did a dry run and wrapped it around where I wanted it to go, so I would know where to cut. It's easier to use the one piece rather than the roll. You have to be able to control the twine so it stays in place while you wrap and then you have to glue it end to end. It's just easier to have it already cut than to struggle with that at the end. You don't want the twine to loosen on you. Sound complicated? Don't give up...it's absolutely not.  

Here's how to get it placed:

After you measure the length you want, put a good dot of hot glue in the upper left corner of your block, or the right...it's up to you. Just know that your flowers will need to cover this, so keep that in mind when you decide how high or centered you put your end pieces. 

Then wrap your twine around your block. Play with it a little until you get it where you want it. Just make sure you end back at the beginning. This is sort of non-negotiable. The ends must match up so you can cover them with your decoration. 

Once you get the end up there with it's buddy, put another spot of glue, and glue that end down. PLEASE be careful! I burned the dickens out of my finger (on another project) and, my Good Gracious...well, it hurt. Bad.

Another thing to remember, don't use a ton of glue here if you can help it. You will be gluing flowers up there. You don't want it to be too bulky. 

Ok, final twine step. I turned my block around and made sure all the twine was sitting tightly where I wanted it, then I put little dabs of hot glue just at the top ridges of the long pieces and right onto the pieces that wrapped around the back corners, for reinforcement. The pictures and clips aren't too heavy, but you don't want your twine to sag.

(Note in the picture on Shanty2Chic, she has a lot more twine than me. I don't know why I did it this way. I have more flowers though, so I think it evens out ;)


Once the glue on the back is dry, you can lay your block down and start to play around with your flower arrangement. When you get them where you want them, lift them one at a time (so you don't forget where you put them ;) and put a little swirl of hot glue on the back and carefully put your flower back down. Be careful not to touch the back of the flower to the front of the other ones! Hot glue is not very forgiving once it smears onto fabric...

Finish gluing your flowers on, press them down carefully, especially where they sit on the twine, to get a good, flat bond. Set your block back up and admire it!


These are my handmade roses and rosettes. I used a fabric called Osnaburg that I use for a lot of my projects. It is an unbleached, natural cotton fabric used in many Primitive styles of décor and reproductive dress. You can use felt, also one of my very favorites, or anything you like.


To learn how to make these, and a variety of fabric flowers, I just did a YouTube search. Below you will find two of my favorites, and how I learned to make these particular flowers.


Next, you'll need something to hold your photos onto the twine. You could use mini clothespins painted or decorated in a myriad of ways, but these are so glam! I picked up two packs of these photo clips at Hobby Lobby in the scrapbook section, (watch for sales, or download the free app to your phone, you'll automatically get a 40% off coupon each month) then I went to the fabric section and picked up a few packs of these little gem-like plastic buttons. All very cheap and you'll have a ton left over for other projects.

This is where the epoxy comes in. It sound harrowing...it did to me, anyway. I didn't want to "mess" with epoxy. But it was truly easy. I picked the buttons I wanted to use, cut the plastic shank off the back with a small craft wire cutters, though a sharp scissors will probably do, and had them ready to go before I mixed the epoxy. It only lasts so long, you have to be ready. I use Gorilla glue, only because it comes highly recommended on any craft sight I find a tutorial on. Just follow the instructions on the package. I did all of these projects and still have a ton left.

Glue your buttons onto the photo clips and set them up where they will be level so the buttons don't slide off while they dry. Now is a good time to think about your photos...


I picked photos for everyone, too. I wanted them to have the full effect of the gift. I wanted all black and white, like at the original tutorial. Now, there are several options you have. This is what I did. I have the Walgreens app on my iPhone. It's free and I HIGHLY recommend it. You can have prints made directly from your phone, in different sizes, with different filters, ready in an hour. For my Aunt, I went on my cousins Facebook, saved a picture of her new baby girl to my phone, and had it printed from the Walgreens app. I wanted 4x4 photos, though, and the app doesn't offer those, I don't think, so I took the rest of my pictures to the local store and just scanned them on the kiosk. Made them all black and white, and 4x4 square. I could have done wallet size, or anything I wanted, but I loved the 4x4 pics. They all fit so well.

When I got home, I quickly matted them with white textured cardstock and they were ready to hang. How do you mat a photo? Oh, it's easy. I just take a piece of cardstock and lay my picture on it close to one corner only allowing enough of the paper to show that I like. Then I just 'eyeball' the other two corners and take a pencil and make a little dash where it looks like the same amount of paper to me. Then I just put it on my paper cutter and cut along the two hash marks. There! You've got a (pretty) perfect square just slightly bigger than your picture. I use Aleen's Tacky glue. It's photo safe and just a dab will do ya. It holds much better than some double sided tapes. I just dab a dot in all four corners and in a big "X" pattern on the back and a few dots along each side. Don't go too heavy, though. You'll have lumps under your picture. And be sure to only put it on the picture, you may get it on the paper where you don't want to see it. Sure, it dries clear, but...you'll still see it. It oozes. You'll wipe it. It'll get dirty, or on your picture. You'll get frustrated. You'll throw the thing across the room. It'll get ugly.

I know from personal experience.

Uh...anyway, he he...

I let my clips dry 24 hours, and the next day I put them together, packed them up and shipped them off (where the real cost came in) or put them under the tree. Instant winner!


Here's mine. I've got a picture of my mother and I when I was 8 months old in England, my husband and his family at the Transportation Museum in Missouri when he was young, my mother and her best friend when they were young girls, and my Great Grandmother Ella. What special photos to me. And the best part? They are interchangeable. You can change them up for holidays or birthdays or occasions. Whatever you like. Very versatile! 


I hope you enjoyed this post, and decide to make a photo block of your own. Let me know how it goes!

Btw...maybe you're thinking, "Hey! What's going on up there on that wall!?" Came back Friday to find out...

Thanks for reading and spending some time with me,

Nanette

* All opinions are my own. I receive no endorsements from any sponsors mentioned in the above post: Hobby Lobby, Aleen's, Gorilla Glue, Lowe's or Walgreens.

Sunday, June 30, 2013

Upcycled Telephone Table

Oh my gosh! How is everyone?! I have been on hiatus for way too long...I do apologize. I really have a lot of projects and adventures to share, I have just had so much going on, it's so hard to find the time to get it all done. I am pretty ambitious, I guess. I want to do it all...right NOW. It sometimes surprises me to realize that I can't do it like I imagine myself doing it. There is always so much that I want to do, I overwhelm myself.

Anyhoo, I have a lovely little telephone table to share with you. First, I must clarify--I did NOT re-do this table. I found it at the Grafton Flea last month. I had to have it. It's just what I would have done, but saved me all the time and put some money in some lovely gal's pocket, to boot! They had so many wonderful up-cycled things in their booth, I just KNOW they watch Flea Market Flip, like Noah and I do.

I walked past this booth twice to get a really good look at all their stuff. I immediately set my eye on this table. I checked the tag...$48.

Whew! A little more than I wanted to pay. I hate to haggle, because I know the work that goes into re-doing furniture pieces, IF they are done right, and not "slopped" together just to make an insane profit. I knew that this was probably an old discarded piece from a garage (free), or at the very least picked up for next to nothing at a yard sale. Heck, they could have even gotten it from someone's curb. I come across a lot of great stuff that way. But, I wanted to be fair. It was done very nicely, and, like I said, exactly how I would have done it. Plus, I'm a sucker for paisley.

I started my haggling...I asked her if she would do it for $30. Yeah, yeah...I know...kind of a low ball offer. But, I didn't want to run the risk that they didn't primer it first.

*Note: Whatever you do, always sand and prime your piece before you paint, unless you have a special paint that boasts "no primer needed", and even then, I'm wary. There is nothing worse for a project than peeling or chipping paint where you don't intend it to do so. You can never quite match up a nice big chip unless, of course, you want the piece distressed and then you can just sand that spot down into a distressed spot.

Ok, where was I? Oh, yeah...haggling. So, thirty was too low, I guess. I got a bit of a grimace. Not too bad of one though, so I knew I had room to keep going. She went $45, I went $38 she went $42. She wasn't moving much, I wanted it, I took it. There you go.

What can I say? I'm a sucker for paisley AND the work already being done for me...this time.


I was longing for something to go next to my front door that I could sort of fake as an entryway since the front opens right into the living room. I had been looking for an old dresser, or would have even settled for a new piece with drawers and cubbies for baskets, which is what I really wanted there, storage is always good, but I fell in love with this and it is the perfect place to sit and put on your shoes.


 Here are some close-ups of the great job these ladies did on the very subtle distressing. Just my style, and not too shabby.


I love how the vintage ash tray's color ties in perfectly with the seat. They are the perfect spot for loose change or keys. And, the paisley really compliments the cut out pattern of the wood in the table front and seat back, don't ya think?


I set the wicker basket I use for my Better Homes and Gardens right under the table, and since there are only three legs, it's a perfect fit!


Edana was an instant fan. Then again, she's always an instant fan of anything new brought into the house.


I have so many other projects of my own to finish. At least two chairs right now and a table or two, and a dresser I'm converting into a buffet for the eat in kitchen. The list goes on and on. Hopefully over the rest of the summer we can get most of what I want done. We are on a week long vacation over my birthday in about three weeks so I have big plans for our "staycation".

I hope you found some inspiration here for your own house. Until next time, thanks for reading!

Nanette 


Wednesday, February 20, 2013

Monogram Front Door Wreath

Well, hello! Did you all have a good Valentine's Day? Noah and I did. Though I didn't take the night off, we went to a nice local restaurant and had a very romantic dinner and the most delicious glass of wine by the fireplace talking about our goals that we are wanting to accomplish this year. For a married couple who have been together this long, being this compatible in our goals and dreams is romantic!

Anyway, I finished the front door wreath that I had been planning on for weeks now. I love it! It was terribly easy and so cheap! Read on, and I'll tell you how I did it...


A little while back, on one of my trips to Hobby Lobby, I picked up this chipboard letter while they were on sale. It was about $2.50 at 50% off. Since I don't live near enough to one to go anytime I want, I try to stock up on what I know I'll be using soon while there's a sale going on. I don't want to buy a bunch of stuff that will just collect on a shelf, so I'm glad I live far enough away to plan my trips. That way, I always buy on sale and only buy what I'll be using eventually in the near future. And, since there are always sales going on, I know I won't miss anything and can plan and get it next time.

 So...I had the paint, paintbrush, and little plastic cups with lids on hand-$0.
 I removed the sticker from the front of the letter. (There were two-one on front, one on back. I can never figure out WHY they always do this.) Then I just painted a THICK coat of pewter grey onto the letter. Don't forget the sides and a little on the back. You can paint the whole back if you want, but once it's attached, no one will see that part, so do what ever strikes your fancy.

Then have yourself a Hersey's Kiss (or two!) while it dries... 


Then, once it was good and dry I painted the whole thing with a THIN coat of the white. I wanted some of the grey to show through and to really show up after distressing. I used a real hair paintbrush because I wanted the paint strokes to show. However, no matter what I did, and no matter how much I washed and tried to pull out the loose strands, it still "shed" all over the initial. It did come off when sanding, but was super frustrating during the painting process. I'll probably stick to my good 'ol sponge brushes next time and just try to 'dry brush' extra paint (like the grey) for distressing.


While that was drying completely ( I even popped in the 300* oven for a couple minutes to 'cure' it and make sure it was REALLY dry...but watch it every second, it is made of paper!) I assembled my artificial flowers. Now here's the fun part. While shopping with my sister Saturday, I was at HL and was looking for just the right flowers. They have beautiful artificial flowers, and are always on sale, but that was still more than I wanted to pay, especially since I was going to take them apart. My sister told me to try the Dollarama we have right in town, she said there were great flowers there. So Sunday I ran uptown and found these beauties. All for a dollar a piece. $6!

I simply pulled the flower heads off the stems and they came right off, staying fully intact. Some I really had to cut the stems off because I wanted to glue them flat onto the letter, so I  reinforced those with hot glue, but that was it. The rest stayed intact and had enough stem to push down into the wreath. These were a great find!

I just layed them out where I wanted them, sticking them into the wreath and then picking them up one by one, adding the hot glue, and placing them right back where I wanted them. Easy peasy!


I had bought this grapevine wreath at Michael's a couple months ago, and used my 40% (or even 50%, I can't remember) coupon and it was around $5.


This is the initial for our last name after sanding and distressing. I used a scrapbooking sanding block because it's so easy to hold and has different grades of sandpaper on each side. It worked SO well.


Here are some close-ups of the details I got on the corners and edges after sanding. You can see the grey and the chipboard brown showing through nicely. I'm glad it turned out so well. It's really like an MDF type material and I have never used this before so I didn't know what to expect.


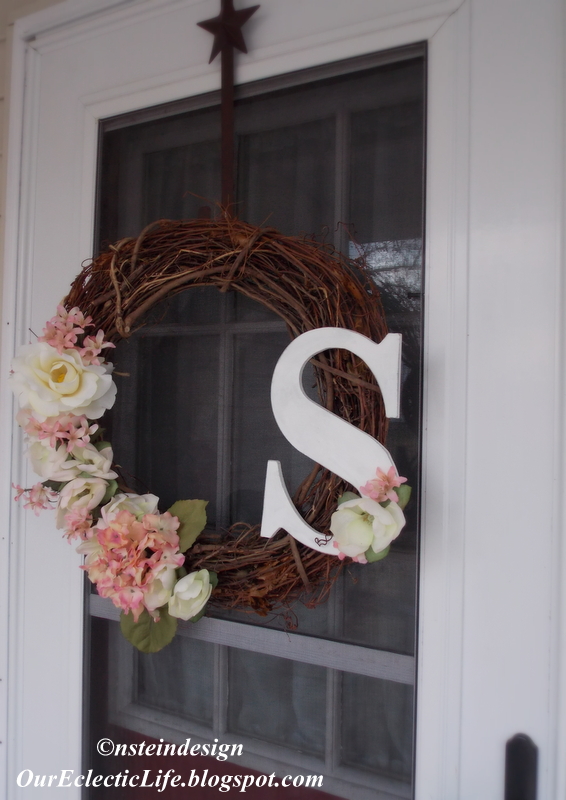
After all the flowers were glued on, I glued the "S" right onto the wreath. I had already layed everything out where I wanted it, so I could assemble everything easily and I would know where the flattest spot was on the wreath for the letter. Then I took a couple of the left over flowers, cut them close, and glued them onto the letter for visual interest to round out the design.

Here's the finished product. It makes me so happy when I pull into the driveway! It's vibrant and just a lovely thing for the door. I hadn't really wanted any pink at first, I wanted all white, but after looking at the dollar store and found these, they all went together so perfectly. Now I can't imagine not having a little pink! I is my favorite color, after all!


This is a Pinterest inspired project, of course, and you can see what inspired me here. You can find a lot of inspiration there for a million projects for your home on the cheap. I'd be delighted if you would follow my Pinterest boards. I have a follow button just in the upper right of my blog page. If you haven't already, it's worth a sign-up. But, I warn you, it's ADDICTING!!

Thanks you so much for reading today, I hope this project inspired you to try something beautiful for your home.

Have a great rest of the week,

Nanette