Hi there!
Here's a project I did this past fall (I know, I know...) and I wanted to share it with you (finally)!
Better late than never, though, right?
It's actually a wreath that can easily be transformed to fit whatever occasion you need because it's so easy to change up!
The things I used were really quite simple to come by. I like to try to pick up some rolls of burlap whenever I am at Hobby Lobby. It's cheap ($4.99 for the natural color, but they sell other colors, too and if you happen to have a 40% off coupon...why not get some?) and they keep it stocked.
Even Walmart has been stocking this now in different widths, colors, and even patterns, but I'm sure with the massively growing popularity of burlap, you should be able to find it anywhere. Bridget, of LittleLovelyLeaders.blogspot.com, a blog for teachers, made the tutorial I used and she got her burlap from Michael's.
Anyway, my point is, I've always got some on hand. I also had the brown chenille ties, so that's what I used to hold it all together. The only thing I had to go out and buy was the metal wreath form. That was at Walmart for just a couple of bucks.
That's it! No glue, and hardly any scissor use, except for cutting up the chenille stems into 3rds...
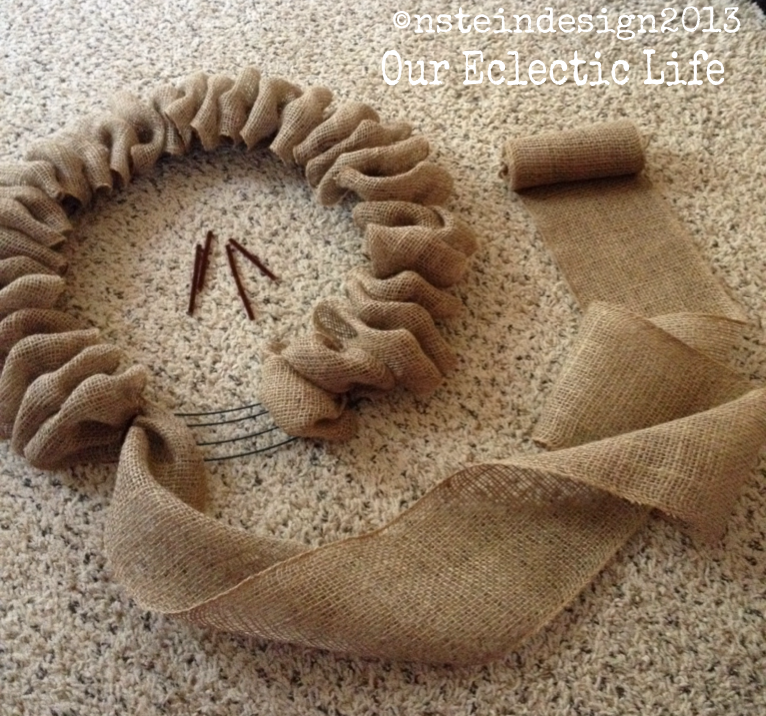
I got a little ahead of myself before I took the first picture, but you get the idea of what the wreath form looks like, right?
This is how I attached my burlap...
I didn't use as much burlap as Bridget's how-to, so my instructions are a wee bit different than hers. If you don't have as much burlap ribbon on hand, or want to save a little money, this is what I did.
I followed the tutorial exactly and attached the end piece of my burlap to the wire using a piece of the chenille tie by poking it through the burlap on either side of the wired wreath form and twisting it tightly in the back.
Then, I just scrunched up the burlap, making loops in the size that I wanted, and attaching those as close to, or as far away from, the last piece that that I had tied onto the form with a chenille stem, until it looked good to me. I just sort of pinched my burlap, pushed the chenille through the holes in the fabric and slid it up and down on the wreath form until I liked where it sat, then just twisted the chenille tightly in the back to secure.

Here is a back view of what the chenille looks like from behind. When you make your loops, you want to make sure the next one is attached at least close enough to hide the stem on the last loop. Make sense?
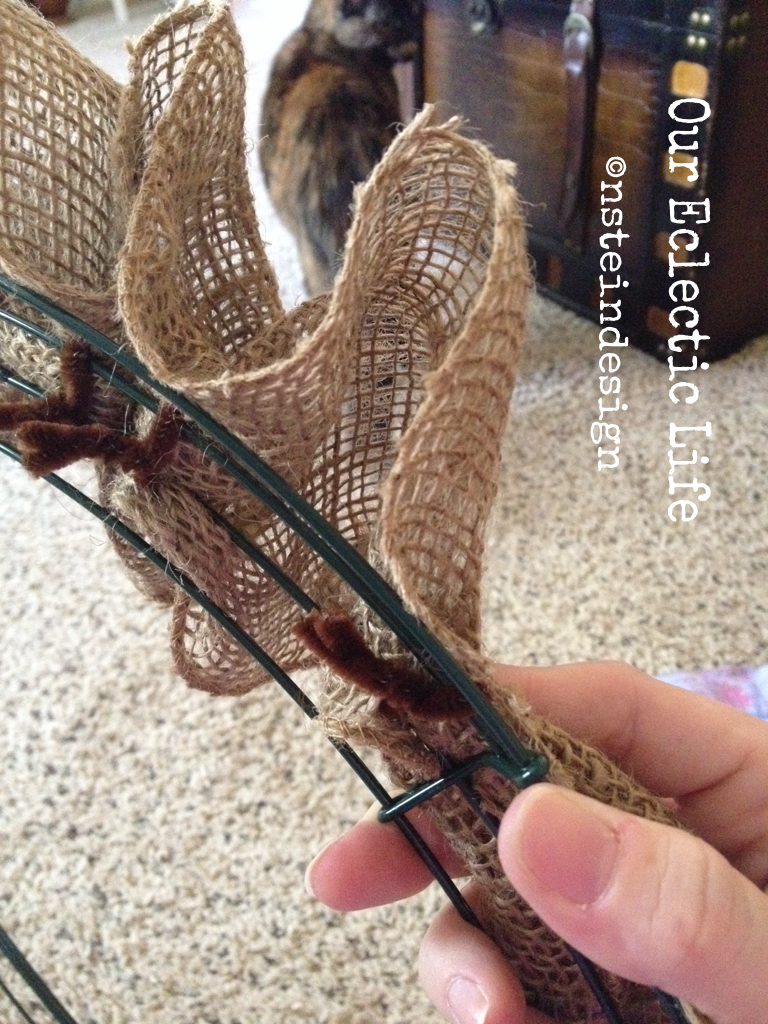
This is what it will start to look like. Mine is not as full, because I didn't use as much burlap, but I'll show you how I fixed that without using a ton of rolls and driving up the cost of this project!

Amazingly, I only used one roll of burlap, and this is how I did it.
I knew I wouldn't have enough to make it evenly full all the way around with just one roll, so, I gauged how much I needed as I went along. I won't lie...I did make a couple of adjustments along the way. Then, when I got back to where I started, I simply started to twist the roll on itself, like you would crepe paper streamers, and loosely wrapped it back around the wreath sort of filling in where it needed it and making sure to cover any visible chenille stems.

When I got to the end, I poked a stem through the underside of the "tail" end and attached it to the wreath form, making sure it was hidden (even though it's the back side, I don't care for 'unfinished edges').
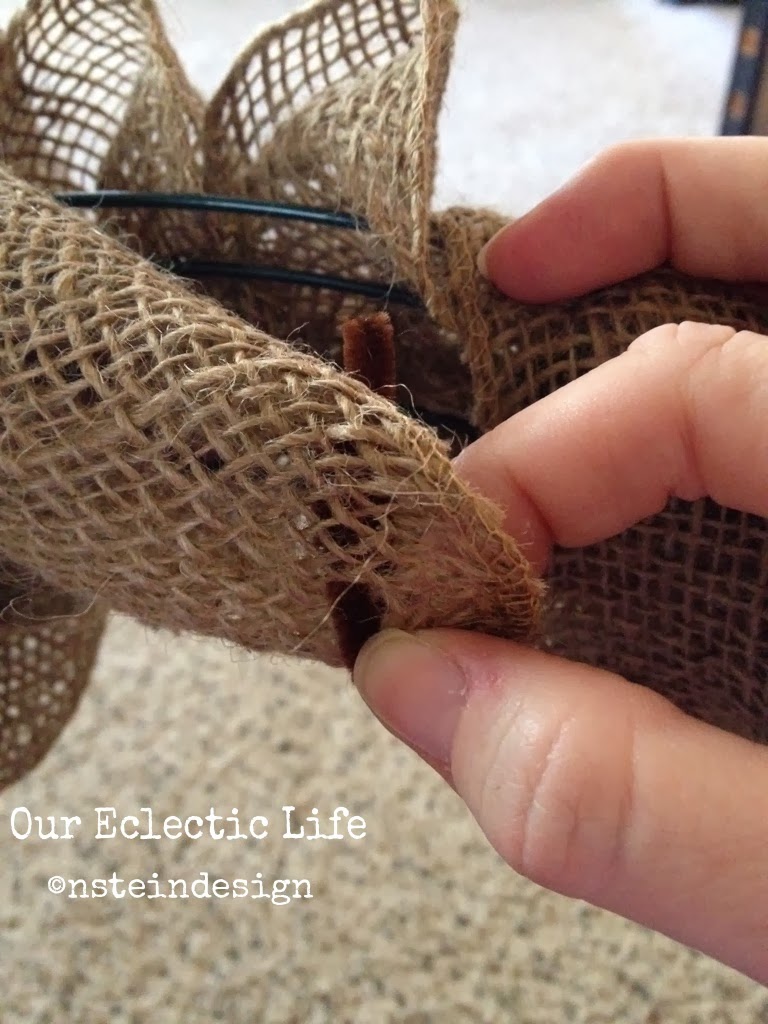
I twisted it onto the form and tucked it under another fold of the fabric.

All hidden away!

Here's the back side of the wreath with the twists of burlap covering the chenille ties and exposed metal wreath form...

And here's the front all filled in!
I just fluffed it up and it's ready to decorate.

Next, what to decorate it with?
It was Autumn and I had just gone on my yearly pumpkin and gourd picking trip with my sister. There is a little farm that grows a wide variety of squash and sells it roadside for cheap! It's in a little town about 40 minutes from us, but the drive is lovely and I love helping a local small business out.
Aside from all the unique pumpkins and gourds, they had this beautiful shellacked Indian corn. There were so many beautiful colors and bundles, I couldn't decide!

I finally picked this bunch; it was the most colorful.
The corn was already bound together with heavy gauge wire, so I just wrapped jute twine around the wire a few times to hide it and worked some twine through the wired wreath form to tie it on. After making sure it was sturdy, and a few adjustments for aesthetics, I tied a little raffia around it and I was done!
The whole thing was easy to hang onto a wreath hook because the wire wreath form was so compatible.

Just look at all those beautiful colors!

What also sold me on this bunch was the fabulous striations of purple throughout the husks! Just beautiful...


Each piece is like a little fingerprint...no two are alike...

Is anyone else as excited as I am about each little kernel of this corn?!


Call me crazy, but I think it's beautiful ;)

If you've been longing for a burlap wreath of your own, I hope you will try making this for yourself. It's not as hard as it may seem and is quite cost effective, since you can change it up to match whatever decor you are into at the time, so it's really worth it. Let me know if you decide to try one and send me a picture of how you decorate it!
Thanks for stopping by today, and have a great week.
Nanette
* All opinions are my own. I receive no endorsements from any sponsors mentioned in the above post: Hobby Lobby, Walmart or Michael's.


