My most valued possession is my family. Even if you are living in a box
somewhere, and you have the love and support of your family, you will always be
wealthy. Love really is all you need. From love, great things will emerge. From
your thoughts, you can create greatness.This is what I need to remind
myself of everyday to be the best person that I can be. Live your life with
gratitude. Be thankful for all that you have everyday, even if it is your eyes
to see or your ears to hear or your feet to walk or your hands to create.
Understand your place in this Universe; how infinitesimally small you are, but
how huge a contribution your Spirit is. Don't wear blinders to the world around
you, you're not the only one here. Be kind, considerate, don't be judgmental,
love others, and yourself. Know that you are perfect inside; that you are
love.


Showing posts with label handmade. Show all posts

Wednesday, June 18, 2014

A Burlap Wreath For All Seasons


Hi there!

Here's a project I did this past fall (I know, I know...) and I wanted to share it with you (finally)!

Better late than never, though, right?

It's actually a wreath that can easily be transformed to fit whatever occasion you need because it's so easy to change up!

The things I used were really quite simple to come by. I like to try to pick up some rolls of burlap whenever I am at Hobby Lobby. It's cheap ($4.99 for the natural color, but they sell other colors, too and if you happen to have a 40% off coupon...why not get some?) and they keep it stocked. 

Even Walmart has been stocking this now in different widths, colors, and even patterns, but I'm sure with the massively growing popularity of burlap, you should be able to find it anywhere. Bridget, of LittleLovelyLeaders.blogspot.com, a blog for teachers, made the tutorial I used and she got her burlap from Michael's.

Anyway, my point is, I've always got some on hand. I also had the brown chenille ties, so that's what I used to hold it all together. The only thing I had to go out and buy was the metal wreath form. That was at Walmart for just a couple of bucks. 

That's it! No glue, and hardly any scissor use, except for cutting up the chenille stems into 3rds...
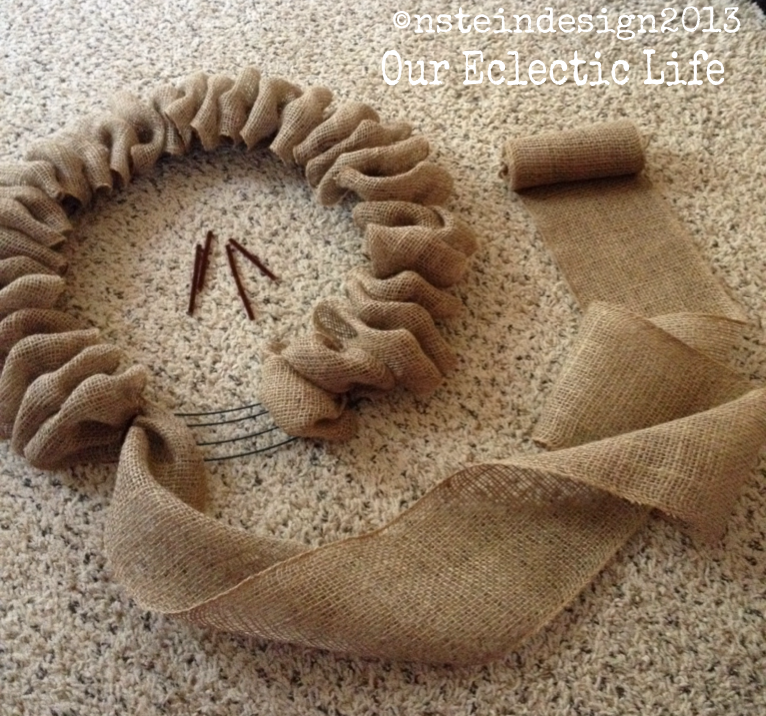

I got a little ahead of myself before I took the first picture, but you get the idea of what the wreath form looks like, right? 
This is how I attached my burlap...

I didn't use as much burlap as Bridget's how-to, so my instructions are a wee bit different than hers. If you don't have as much burlap ribbon on hand, or want to save a little money, this is what I did.

I followed the tutorial exactly and attached the end piece of my burlap to the wire using a piece of the chenille tie by poking it through the burlap on either side of the wired wreath form and twisting it tightly in the back.

Then, I just scrunched up the burlap, making loops in the size that I wanted, and attaching those as close to, or as far away from, the last piece that that I had tied onto the form with a chenille stem, until it looked good to me. I just sort of pinched my burlap, pushed the chenille through the holes in the fabric and slid it up and down on the wreath form until I liked where it sat, then just twisted the chenille tightly in the back to secure.


Here is a back view of what the chenille looks like from behind. When you make your loops, you want to make sure the next one is attached at least close enough to hide the stem on the last loop. Make sense? 
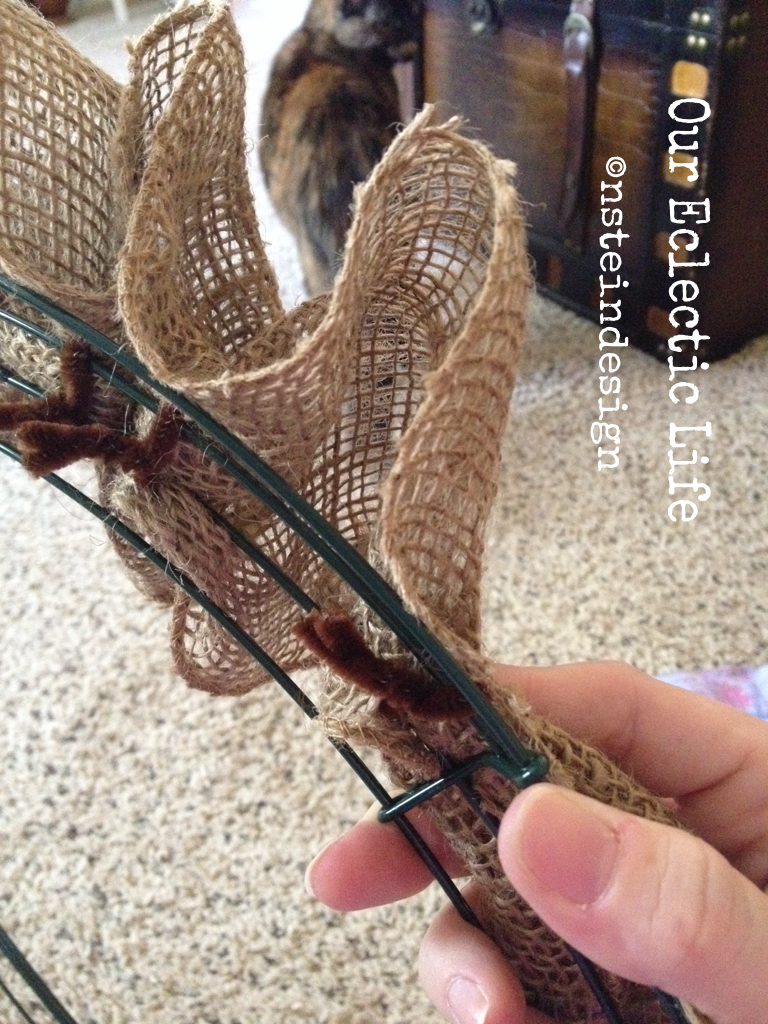

This is what it will start to look like. Mine is not as full, because I didn't use as much burlap, but I'll show you how I fixed that without using a ton of rolls and driving up the cost of this project!


Amazingly, I only used one roll of burlap, and this is how I did it.

I knew I wouldn't have enough to make it evenly full all the way around with just one roll, so, I gauged how much I needed as I went along. I won't lie...I did make a couple of adjustments along the way. Then, when I got back to where I started, I simply started to twist the roll on itself, like you would crepe paper streamers, and loosely wrapped it back around the wreath sort of filling in where it needed it and making sure to cover any visible chenille stems. 


When I got to the end, I poked a stem through the underside of the "tail" end and attached it to the wreath form, making sure it was hidden (even though it's the back side, I don't care for 'unfinished edges').
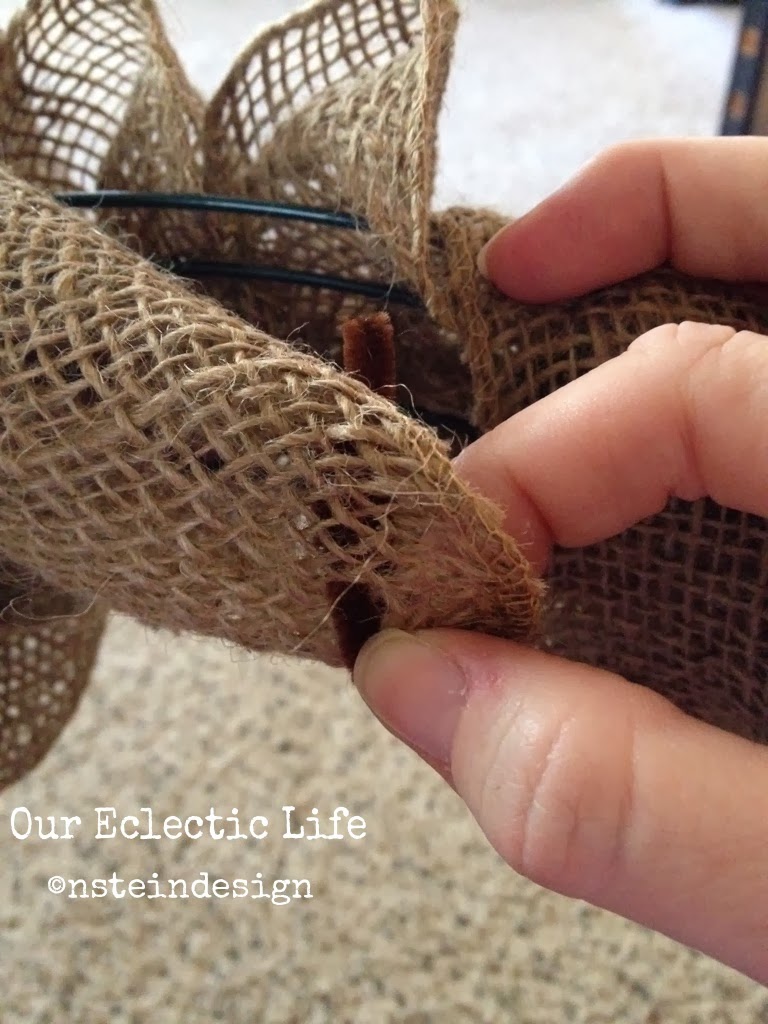

I twisted it onto the form and tucked it under another fold of the fabric.


                                                                   All hidden away!


Here's the back side of the wreath with the twists of burlap covering the chenille ties and exposed metal wreath form...


And here's the front all filled in! 
I just fluffed it up and it's ready to decorate.


Next, what to decorate it with?

It was Autumn and I had just gone on my yearly pumpkin and gourd picking trip with my sister. There is a little farm that grows a wide variety of  squash and sells it roadside for cheap! It's in a little town about 40 minutes from us, but the drive is lovely and I love helping a local small business out. 

Aside from all the unique pumpkins and gourds, they had this beautiful shellacked Indian corn. There were so many beautiful colors and bundles, I couldn't decide!


I finally picked this bunch; it was the most colorful.

The corn was already bound together with heavy gauge wire, so I just wrapped jute twine around the wire a few times to hide it and worked some twine through the wired wreath form to tie it on. After making sure it was sturdy, and a few adjustments for aesthetics, I tied a little raffia around it and I was done! 

The whole thing was easy to hang onto a wreath hook because the wire wreath form was so compatible. 


                                                      Just look at all those beautiful colors!


What also sold me on this bunch was the fabulous striations of purple throughout the husks! Just beautiful...


 Each piece is like a little fingerprint...no two are alike...


Is anyone else as excited as I am about each little kernel of this corn?! 


Call me crazy, but I think it's beautiful ;)


If you've been longing for a burlap wreath of your own, I hope you will try making this for yourself. It's not as hard as it may seem and is quite cost effective, since you can change it up to match whatever decor you are into at the time, so it's really worth it. Let me know if you decide to try one and send me a picture of how you decorate it!


I want to say thank you to Bridget, at Little Lovely Leaders for her original tutorial on this burlap wreath how-to. Be sure to drop on over to her blog for more great ideas!

Thanks for stopping by today, and have a great week.

Nanette


* All opinions are my own. I receive no endorsements from any sponsors mentioned in the above post:     Hobby Lobby, Walmart or Michael's.

Saturday, December 15, 2012

Indoor Christmas Decor


Well, it's taken me a little while, but I'm actually starting to pull it all together. I'm enjoying my weekend and slowing down a little. I wanted to share some more of the traditional decorations we use each year, as well as some new projects I've completed.

First up is this mini tree I purchased years ago to decorate with this mini Noah's Ark ornament set we collected over the years, as gifts from Noah's parents.


I also bought this little tree at the same place that I bought my Barnwood hutch also in this picture. It reminds me of the little feather trees. I found these little bottle cap ornaments that have vintage pictures of Santa and Snowmen and the words 'Believe' and 'Merry Christmas". These are very easy to make on your own, though. I did it last year for my Halloween tree with bottle caps I bought at Archivers, craft/floral wire, Crystal Effects (a scrapbooking item. It's a clear glue medium that dries hard), and Halloween scrapbooking paper. I just used the punch that matched the diameter of the bottle cap (they are pretty standard to match) and put a little Crystal Effects on the inside of the Cap, placed the paper in, covered it with a generous amount of the CE and let it dry over night. Noah used his Drimmel rotary tool to drill the holes (before I got them decorated) and when they were dry, I threaded the wire in, twisted it and made a hook. I made a ton of them! This year, though, I'm short on time, and at only $1 a piece, it was worth the shortcut.


I also got this little star topper for just a couple bucks there, too. It was too cute to pass up. It's perfect for what I needed, don't you think?


Here is the Santa Claus tea service I bought from a gift shop years ago. It's a good thing there are only three of us...there were only three cups left when I went back to buy it. It comes with a nice big cookie jar, too.


Here's the Barnwood hutch decked out. I may or may not be re-arranging things a bit...again...always experimenting!


Here are my Mom's Nutcrackers.


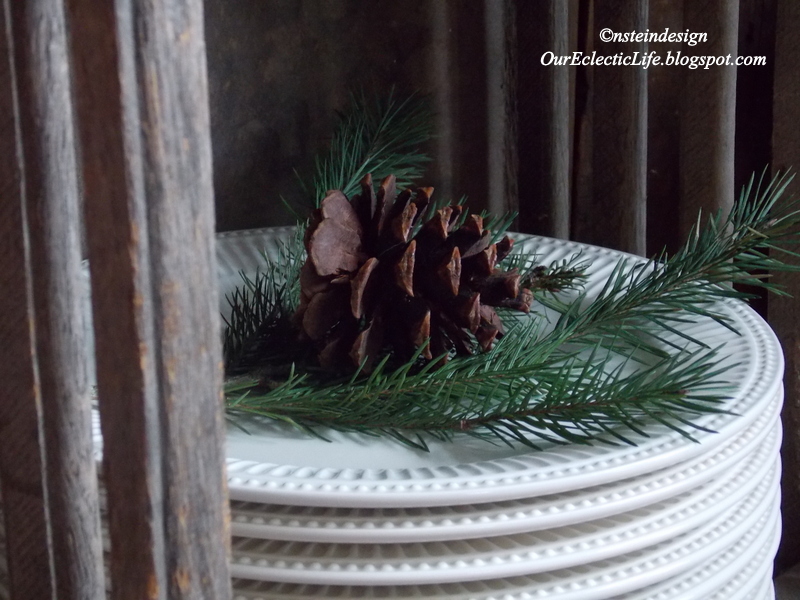
A subtle bit of greenery on my stack of white plates. Always a bargain hunter, I picked these up at Wal-mart for just $1 a piece. They are heavy ceramic made by Better Homes and Gardens. I just love the simplicity of that Ironstone white look. I used them on my Thanksgiving table this year and was so very pleased with how they looked.  I was recently in a Deals store and picked up perfectly matching white ceramic mugs for just a buck a piece, too! You don't have to spend a fortune to dress your home. Besides, if one gets broken in the wash, it won't break the bank. Plus, I bought plenty, so we won't run out too soon...


Here's another project I did. Last year at the large craft show my mother and I always went to for all the seasons, I bought this old sewing machine drawer. I love old wooden boxes, so this was a must. I was at Old Time Pottery (a favorite of mine. Have you ever been to one? You can find a lot at a steal of a deal!) and I bought these little glass apothecary jars for $.50 a piece. I did splurge on the flameless mini pillars, though. They were $2 a piece, but made with real wax and are scented vanilla. I put some Epsom salt in each of the little jars (a 32 oz or 2lb box of Epsom salts at Wal-mart was only $.88) and placed the 'candle' right on top. Just sort of twist it down in there, and it looks like it's sitting in snow. I took some of my twine and tied it around the top of the jar.


Next, I took some of the flower foam (the kind you soak with water for real arrangements) that I had leftover (keep everything!) and cut it to size. I placed it in the drawer, covered it with some sheet moss (I bough a ton of it on clearance last year at Michael's), and stuck in some of the branch clippings from our tree, some berry picks I already had, some pine cones, eucalypytus sprigs, and that's it. A woodsy-winter centerpiece!


The next thing I did was to fill this old ammunition box with winter greenery to place under my console table to hide the cords. I purchased this box at the same booth at the same craft show I bought the sewing machine drawer from. We didn't notice until we got home that it was made in Alton, Illinois. Pretty neat since we are from that area and traveled over an hour to go to this show!


You see how the power cords for the tree, lamp and snowman light are all unattractively hanging down exposed to the rest of the room? We usually don't have this many cords here, but because of the decorations, we do. We also usually keep the dogs basket of toys and babies under there, but I moved that under the chair, and used the vintage ammunition box filled with greenery instead.


                               Problem solved!


I used this red metal mailbox that I bought several years ago in the same gift shop that I got my tea service to hold some flocked greenery and one of my mercury glass ornaments I mentioned in my O' Tannenbaum post. Last year I had them all out, but just a few will do this year. I loved mixing the new ornaments with the vintage on our tree this year. I know mercury glass is, in essence, vintage, but I have some more modern ornaments in silver and that are mirrored and these tied it all in so nicely, so, on the tree they went!


This is a snowman lamp I made inspired by a pattern I bought from Tennessee Ridge Primitives. I found this little snowman hat at a craft store...it was perfect! I bought up a lot of these lamps at a shop in St. Charles, every time we visited. At only $3 they are an absolute steal! Everything else I had on hand, and handmade the whole thing. One of these days I swear to myself I will start selling on Etsy...all a matter of time...
I have such an eclectic array of what I like to do, it can get overwhelming if you don't organize well.


A friend of mine posted her great find of a large $10 owl like these on Facebook. She settled for the two smaller ones at $5 each. I had to have them, too. They were cuter than the one large one, and at $10 for two...I thought it was worth it ;)   The Advent 'calendar' in the background will be looked at in detail in the next post, along with quite a few more projects, so stay tuned!


This is an antique sleigh and Santa with his elves that belonged to my Grandmother. I remember sitting and looking at this all the time as a child. How special it is that I have it now. (The little pine cone in front of it is one of a matching pair Tyler and I made in Scouts. I put them out every year. It's been about 9 years and counting!)


Another little display, and my Christmas tree clock I bought years ago. It works and, if I would put the batteries in that part of it, plays a Christmas song every hour...
On top are the little Russion Nesting Doll inspired nesting Santa's I got from my Mom.


Here is a mason jar decked out with a vintage Santa image I bought at that same craft show. I paid a whopping $5 bucks!! I bought them for family members to go with their gifts. This is something that I would make, but at only $5...I love supporting a local artisan! It is one of my favorite things. With a little flameless tea light, it's just perfect.


 The Nesting Santa's


Here are two projects I made in 2008 when I had a booth at a large craft and antique mall in Alton. I sold them, but made them for myself, as well. The snowman is made from chenille, and the Santa, or Mr. Kringle, is from a pattern I bought and followed from Primitive Blessings by Twigs N Sprigs.  This Mr. Kringle is one of my all time favorite dolls I've made. I hand stitched his face and used real Alpaca wool for his hair and beard. That's a baby sock I primmed up to hold his winter fare!


Here's a little vintage snowman I was inspired to draw up from something I saw online. He's been around for quite awhile. I used one of my mini pumpkin stems painted orange for his nose. Like I said...keep everything! Pretty darn cute, huh?


I hope some of these projects inspired you to do some of your own. My next post is going to have quite a bit more, so check back! There are some really quick, cheap and easy ways to spruce your home up for the holidays, or make a gift or two for friends and family.

At the time I am working on this post, I've heard about the terrible tragedy in Newtown, Conn., as I'm sure many of you have. I am writing a post for my sister blog, Confessions of a Thinkaholic about my feelings about this. I'll put the link to that in my next post, if you are interested. I just ask that you keep all of those affected by this, including each other, in your thoughts and prayers. Now is the time to band together and pray for a better life for humanity. Hold your loved ones close, make fond memories, remember those less fortunate, and have an air of love about you...that is the cause and effect we need.

Thank you so much for reading, and the brightest of blessing to all of you.

Nanette